Electric Milk Frother
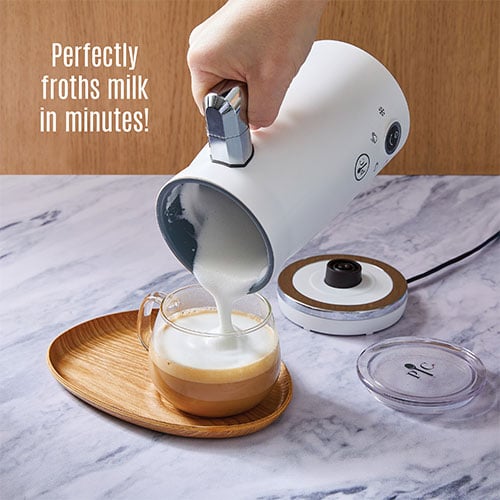
Perfectly Froth Milk in Minutes
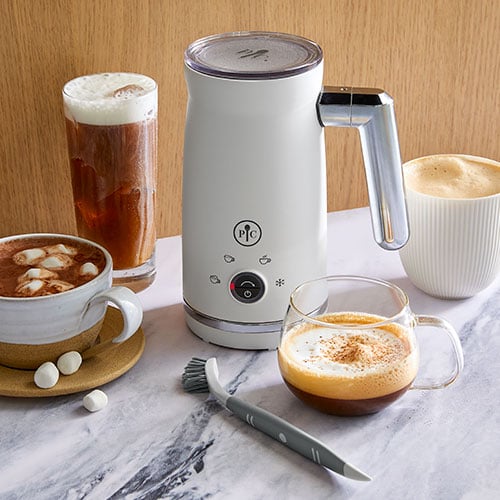
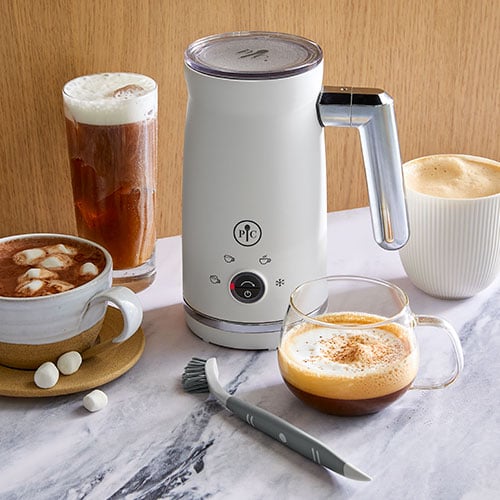
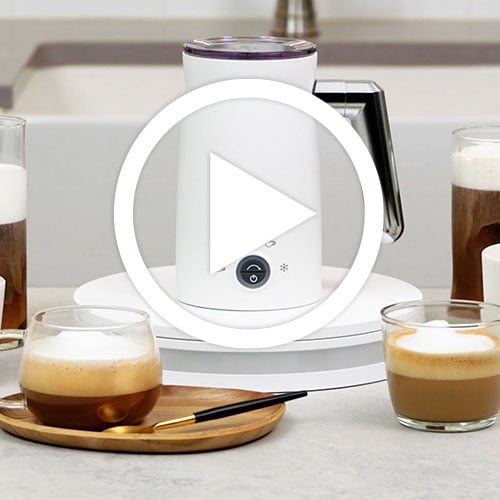
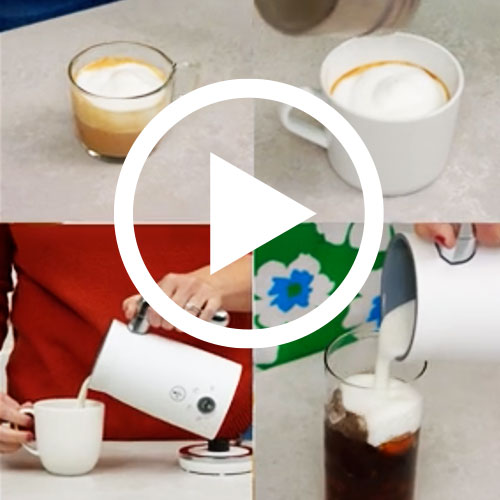
With the Electric Milk Frother, you can top your favorite drinks with a luscious layer of homemade foam or frothed milk. Take it a step further and make your own cappuccinos, macchiatos, and lattes.
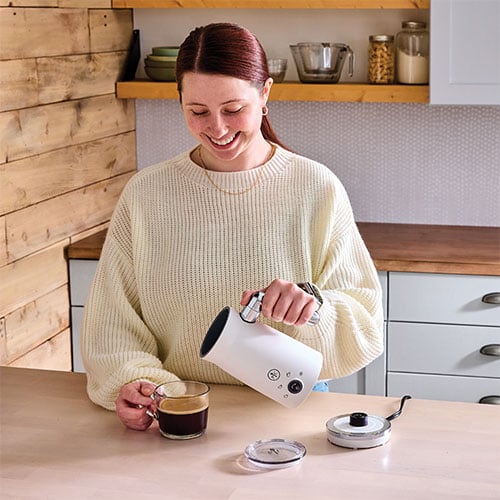
This compact frother quickly turns cold milk (or milk alternative) into your choice of high foam, low foam, warmed milk, or café-style cold foam with the push of two buttons. When it’s ready to go, you can pour it into your mug thanks to the ergonomic handle.
Key Features
- Four easy-to-use settings let you make your choice of thick foam, light foam, light froth, or cold foam.
- High Foam: Make rich, thick foam perfect for macchiatos and cappuccinos.
- Low Foam: Create light, airy foam and warmed milk for lattes and café mochas.
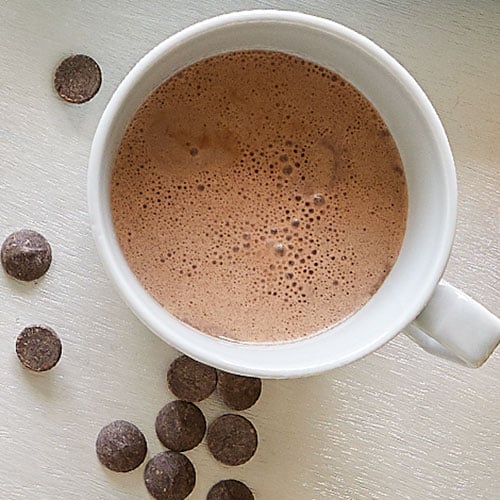
- Warming Only: Make warmed milk with a very light froth, which is the perfect addition to café au laits and hot chocolate.
- Cold Foam: Top homemade iced coffees and iced matchas with café-style cold foam.
Thoughtful Design Elements
- Whisper-quiet technology ensures there’s barely any noise when making foam or froth.
- The sleek, compact design doesn’t take up too much cabinet or countertop space, making it easy to store when not in use.
- Ergonomic handle lets you remove the frother from the power base and pour without straining your hand or wrist.
- Nonstick coated interior for easy cleaning.
- The whisk is perfectly located to ensure your foam retains its shape and texture.
Product Details
- Makes up to 1½ cups (375 mL) of foam or froth
- Nonstick coating is made without PTFE, PFOA, or PFA
- Lid, lid gasket, and pitcher interior are hand wash only
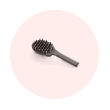
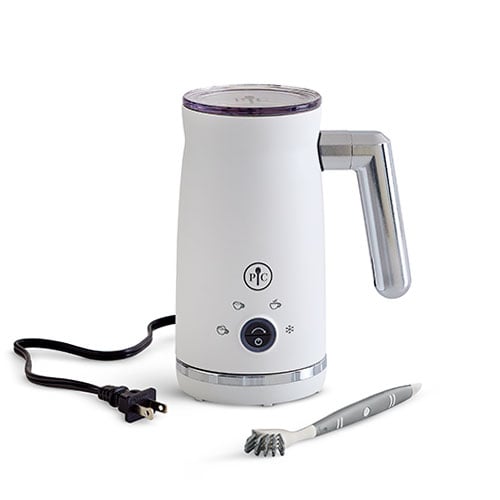
- Includes a Dual-Sided Cleaning Brush and start guide
Specs
- Assembled: 8" x 6½" x 4" (20 cm x 17 cm x 10 cm)
- 500 watts
- AC power supply of 120 volts
- 1.7 lbs. (700 g)
Guarantee
- 2-year guarantee
Ways to Use
Frosted Lemonade or Frosted Orange Juice
1. Add ¼ cup (60 mL) half & half and 2 tbsp (30 mL) Gourmet Limoncello Syrup or lemon-flavored coffee syrup to the Electric Milk Frother. Set to COLD FOAM and press start.
2. Pour ¾ cup (175 mL) lemonade or orange juice over ice and top with the foam.
3. Top with zest, if you’d like, and stir.
Fruit & Cream
1. Add ¼ cup (60 mL) half & half or milk and 2 tbsp (30 mL) Gourmet Cherry Almond Syrup or your favorite coffee syrup to the Electric Milk Frother. Set to COLD FOAM and press start.
2. Pour the foam on top of 1 cup (250 mL) fruit like strawberries, cherries, and blueberries.
London Fog
1. Add ¼ cup (60 mL) half & half or milk to the Electric Milk Frother. Set to WARMING ONLY and press start.
2. Once it’s fully warmed, add 1 bag of Earl Grey tea to the warmed milk. Allow it to steep for 2–4 minutes. Add Gourmet Limoncello Syrup.
-
Use & Care
Use & Care
Use & Care
FREQUENTLY ASKED QUESTIONS
Q: Why do I need to complete the initial test run?
A: The initial test run will help you get familiar with your Electric Milk Frother while ensuring it performs at its best before you start using it.
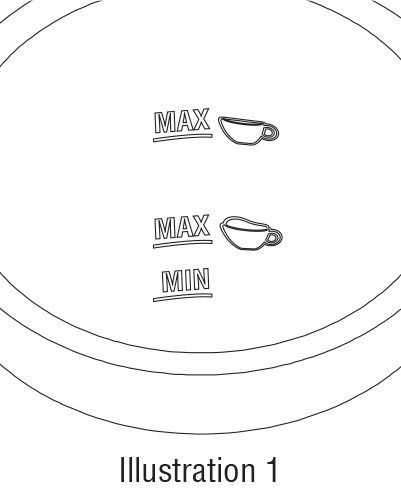
Q: Why are there two maximum lines?
A: The first line is the Maximum Froth Line (which is closest to the bottom). Pour your milk to this line when using the High Foam, Low Foam, or Cold Foam settings. The second line is the Maximum Non-Froth Line, which you'd only use with the Warming Only setting.
Q: Which materials is this product made of?
A: The body, whisk, and base feature the following materials:
- Polypropylene
- Polyoxymethylene
- Stainless Steel
- ABS
Q: Can I take off the gasket on the lid for deep cleaning?
A: Yes, When you place the lid back on, make sure the fins are facing outward.
Q: Why didn't my milk froth?
A: Be sure you selected the correct setting. High Foam will give you the most froth and the Warming Only setting will not froth at all. Also, allow the unit to rest 5 minutes between each cycle for best foam results.
You should also check the type of milk you're using. While results vary by brand, fresh dairy milk produces the best results.
Q: What is the difference between the 4 settings?
A:
- High Foam: Make rich, thick foam. Try it with macchiatos and cappuccinos!
- Low Foam: Make light, airy foam and warm milk, Try it with lattes and cafe mochas!
- Warming Only: Make warmed milk with very light froth. Try it with cafe au laits and hot chocolate.
- Cold Foam: Make cafe-style cold foam. Try it with iced coffees and iced matchas!
Q: What is the capacity of the Electric Milk Frother?
A: The Minimum Line is 1/3 cup (75 mL), Max Froth line is 2/3 cup (150 mL), and Max Non-Froth Line is 1-1/3 cups (300 mL).
Q: Does the pitcher need to be on the base in a certain way?
A: No. The pitcher can be placed back onto the base in any direction.
Q: How does the Electric Milk Frother charge?
A: The Electric Milk Frother is a corded electric product that plugs in an outlet. See Safety & Use instructions for more details.
Q: Can I use flavoring in the Electric Milk Frother?
A: Yes, We recommend no more than 1 tbsp (15 mL) of thin syrup or 1/4 tsp (1 mL) of flavored extract. Don't add thick syrups like caramel sauce and chocolate syrup. Instead, drizzle these over your finished drinks!
You can also add a single-serving packet of hot chocolate mix when using the Warming Only setting.
Q: Which milk works best with this product?
A: Dairy milk works best. The fresher the better! Results will vary basd onthe type and brand of alternative or plant-based milks you use. Results may also vary with organic milk as well.
SAFETY AND USE INSTRUCTIONS
- Read, understand, follow, and save all Safety and Use Instructions to avoid injury.
WARNING
- • Read all instructions before using. When using electrical appliances, basic safety precautions should always be followed.
- • Adult supervision is required when using with children or persons with reduced physical, sensory, or mental capabilities or lack of experience and knowledge. Close supervision is necessary when any appliance is used by or near children. Children should be supervised to ensure that they DO NOT play with the appliance.
- • This appliance is not intended for use by persons (including children) with reduced physical, sensory, or mental capabilities, or lack of experience and knowledge, unless they are closely supervised and instructed concerning use of the appliance by a person responsible for their safety.
- • Choking Hazard. This product contains small parts which may constitute a choking or suffocation risk for small children. Adult supervision required.
- • Keep the unit and cord away from children. Never drape the cord over the edge of a counter, never use an outlet below the counter, and never use with a power strip or extension cord. DO NOT let cord hang over edge of table or counter or touch hot surfaces.
- • Avoid contact with any moving parts while in operation. Keep your hands, hair, clothing, spatulas, and other utensils away from the unit during operation to reduce the risk of injury to persons and/or damage to the unit.
- • DO NOT move the unit while in operation. This appliance only intended to be used for frothing and heating milk. DO NOT use this appliance for other than intended use.
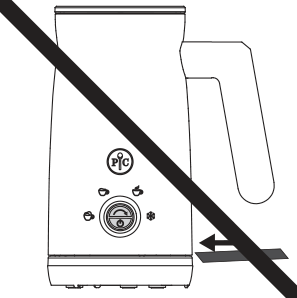
- • DO NOT put foreign objects into gaps and crevices of the unit. It is prohibited to insert utensils or other foreign matter into gaps or crevices. This may cause electric shock or other dangerous accidents.
- • Keep hands and utensils out of this appliance while using to reduce the risk of severe injury to persons or damage to the frother.
- • DO NOT attempt to modify or repair the unit or any part inside, as this may cause electric shock, fire, melting, or injury.
- • Do not operate any appliance with a damaged cord or plug or after the appliance malfunctions or has been damaged in any manner. Call the Solution Center at (888) 687-2433 (United States) or (800) 342-2433 (Canada) for assistance.
- • DO NOT touch the hot surface. Use the handle or the button.
- • Contents will be hot after use. Use caution when pouring and consuming beverage.
- • DO NOT drink directly from the frother.
- • Extreme caution must be used when moving an appliance with hot liquid.
- • Do not place on or near a hot gas or electric burner, or in a heated oven.
- • To protect against electrical shock, DO NOT immerse or operate the unit, cord, or plugs in water or other liquid.
- • DO NOT operate the unit on an unstable or wet surface. Ensure that the appliance is used on a firm, dry, and flat surface out of reach of children, this will prevent the appliance from overturning and prevent damage or injury.
- • DO NOT use outdoors; intended for indoor countertop use only.
- • DO NOT let the cord touch hot surfaces.
- • When in use, DO NOT place the unit against a wall or against other appliances. Leave at least 6" (15 cm) of free space on the back and sides of the unit. DO NOT operate the unit on or near materials such as tablecloths, towels, curtains, etc. DO NOT place anything on top of the unit.
- • DO NOT pick up or remove pitcher off the power base while the frother is running.
- • Never add to container while appliance is operating. Stop appliance by pressing the “Start” button and then restart when ready.
- • Unplug from outlet when not in use and before cleaning. Remove from power base, allow to cool, remove lid, and empty pitcher before putting on or taking off parts, and before cleaning.
- • Only use accessories or attachments that are sold by Pampered Chef and are designed for use with this unit. DO NOT use accessories or attachments with, or in, non-approved appliances (such as an oven, microwave, stovetop, grill, etc.), as this may cause damage which can negatively affect performance of the unit.
- • DO NOT use the attached base other than for its intended use.
- • Avoid contacting moving parts.
- • This appliance can be used by children aged from 8 years and above if they have been given supervision or instruction concerning use of the appliance in a safe way and if they understand the hazards involved. Cleaning and user maintenance shall not be made by children unless they are older than 8 and supervised. Keep the appliance and its cord out of reach of children aged less than 8 years.
- • Scalding may occur if the lid is removed during the brewing cycles.
- • The use of non-Pampered Chef or non-approved accessories or attachments may cause injuries or damage to the unit. Any accessory or attachment that has been damaged in any manner must not be used.
- • Turn off the appliance by pressing the start button to stop operation if running and remove the plug from the wall outlet.
- • A short power-supply cord is provided to reduce risks resulting from becoming entangled in or tripping over a longer cord.
- • DO NOT use with thick syrups.
- • Save these instructions.
SAFEGUARDS
- • This appliance is for household use only; it is not intended for commercial use.
- • Never cover the air vents. Doing so may cause overheating and damage the unit. See parts illustration on page 6.
- • The unit should be placed so any steam does not vent directly onto the kitchen cabinets. Steam may damage cabinets.
- • Always operate the appliance with lid in place.
- • DO NOT use metal utensils as it will damage the interior coating.
- • DO NOT operate the appliance without liquid in it to avoid damaging the heat elements.
- • Clean after each use. Refer to the Cleaning section for proper maintenance.
- • Never connect this unit to an external timer switch or separate remote-control system.
- • DO NOT store the unit in direct sunlight.
ELECTRICAL HAZARDS
- • Persons with pacemakers or users of hearing aids or cochlear implants should consult with authorized medical personnel before use. Refer to the instructions of medical equipment providers.
- • Use only with a 120V 60Hz power outlet with a minimum power rating of 15A. Failure to follow can result in electrical shock, fire, or other serious injury.
- • Before connecting the appliance to the power outlet, check that the voltage indicated above corresponds with the voltage in your home. If this is not the case, contact a qualified electrician.
- • To protect against a fire, electric shock or personal injury, DO NOT immerse cord, electric plugs, pitcher or power base in water or other liquids.
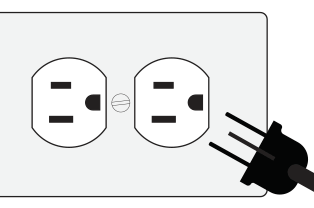
- • This appliance has a polarized plug (one blade is wider than the other). To reduce the risk of electric shock, this plug is intended to fit into a polarized outlet only one way. If the plug does not fit fully into the outlet, reverse the plug. If it still does not fit, contact a qualified electrician. Do not attempt to modify the plug in any way.
- • DO NOT insert or remove the plug with wet hands. To avoid injuries due to electric shock, make sure your hands are dry before plugging and unplugging the unit.
- • Inspect the cord and unit for damage before each use.
- • If the plug fits loosely into the outlet, or if the outlet or plug feels warm, DO NOT use that outlet.
- • DO NOT use an adaptor or inverter with this appliance.
- • Always unplug the unit when not in use to prevent accidents (such as fire, electrical leakage, failure, etc.)
- • Never pull the cord to unplug the unit.
PARTS
A. Power Base
B. Feet
C. Lid
D. Lid Gasket
E. Pitcher
F. Handle
G. Whisk
H. Brush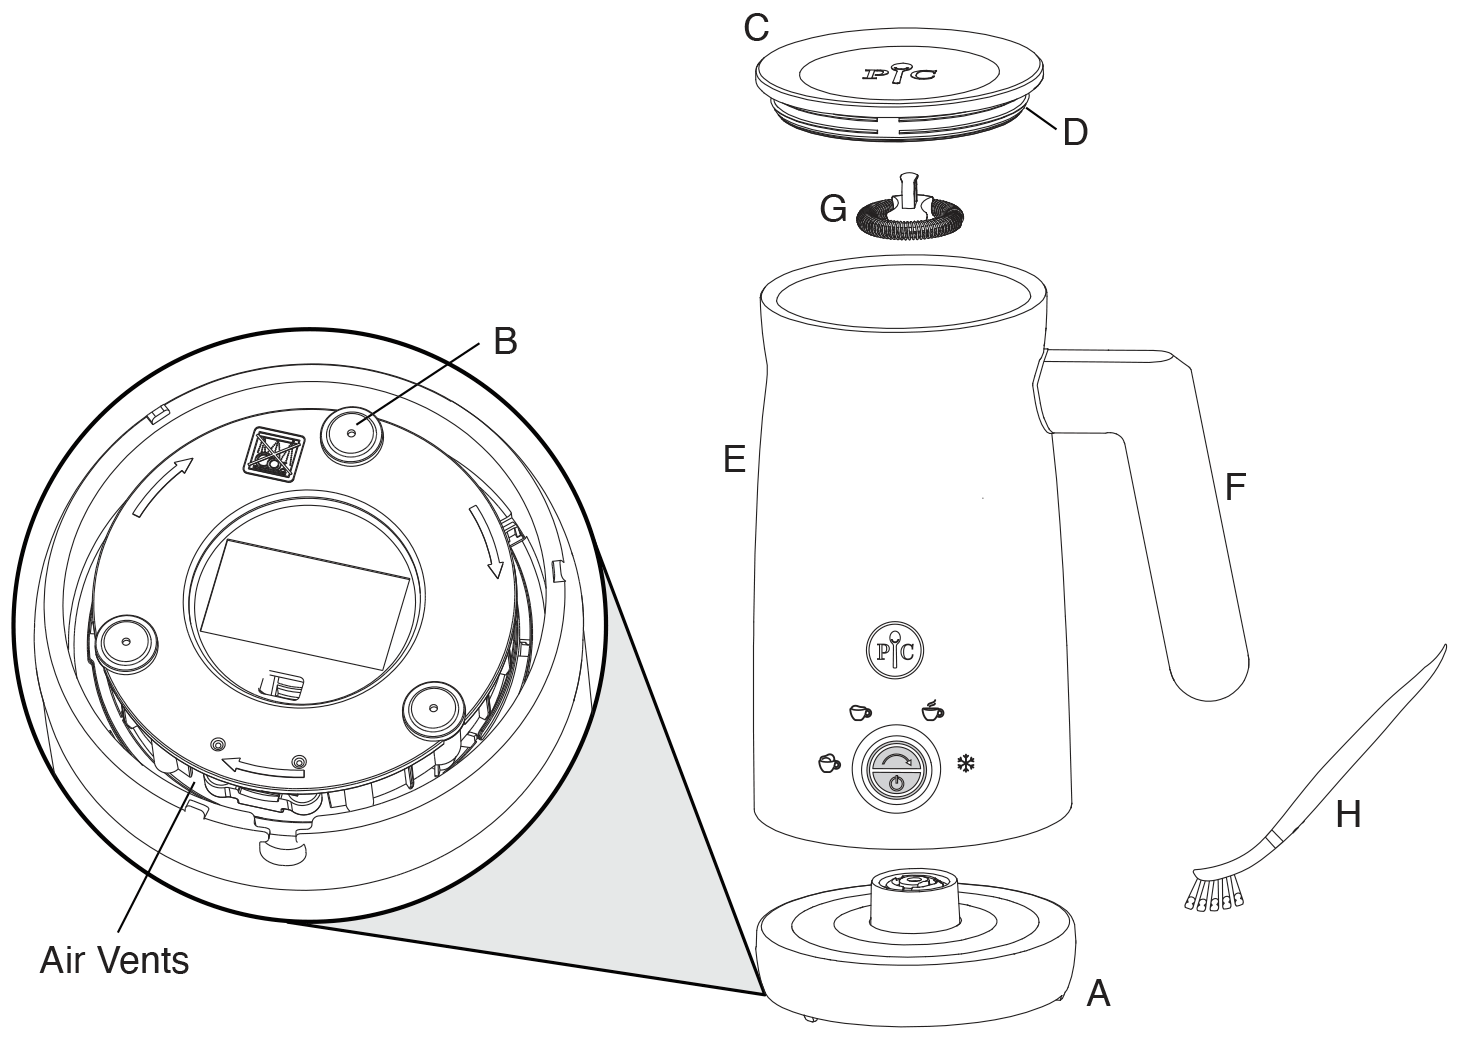
DISPLAY
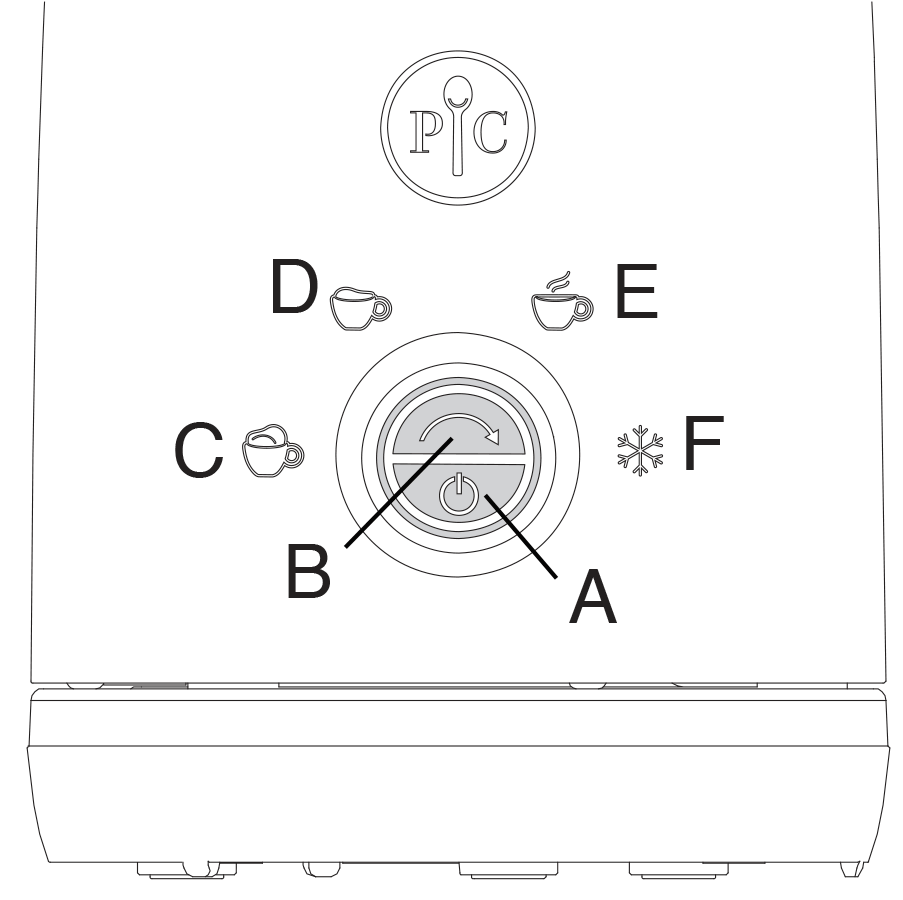
A. Start Button
B. Scroll Button
C. High Foam
D. Low Foam
E. Warming Only
F. Cold FoamCLEANING
Always disconnect the appliance from the power outlet and allow all parts to cool down before cleaning
CAUTION: DO NOT wash any parts in the dishwasher. Never immerse the pitcher, power base, or power cord in water, or allow moisture to come into contact with these parts. This may permanently damage the product and void the guarantee.
- • Lid, lid gasket, and whisk are hand wash only. Rinse thoroughly and dry.
- • Using the cleaning brush provided, wash the inside of the pitcher with a combination of a mild soap and water and then wipe clean with a soft damp towel.
- • Wipe the outside of pitcher and power base with a soft towel. DO NOT immerse in water.
- • DO NOT use household/commercial cleaners or scouring pads.
USE
BEFORE THE FIRST USE
- • Remove all the packaging.
- • Read all the instructions in this document.
- • Clean all parts. See the Cleaning section for instructions.
- • For any questions, call the Solution Center at (888) 687-2433 (United States) or (800) 342-2433 (Canada) for assistance.
- For best results, fill to the minimum line at least. To prevent overflowing, DO NOT fill past the maximum froth and maximum heat lines shown in illustration 1.
- Minimum Line: ⅓ cup (75 mL)
- Maximum Froth Line: ⅔ cup (150 mL)
- Maximum Non-Froth Line: 1⅓ cups (300 mL)
Initial Test Run
- 1. Place the appliance on a flat, dry, and stable surface.
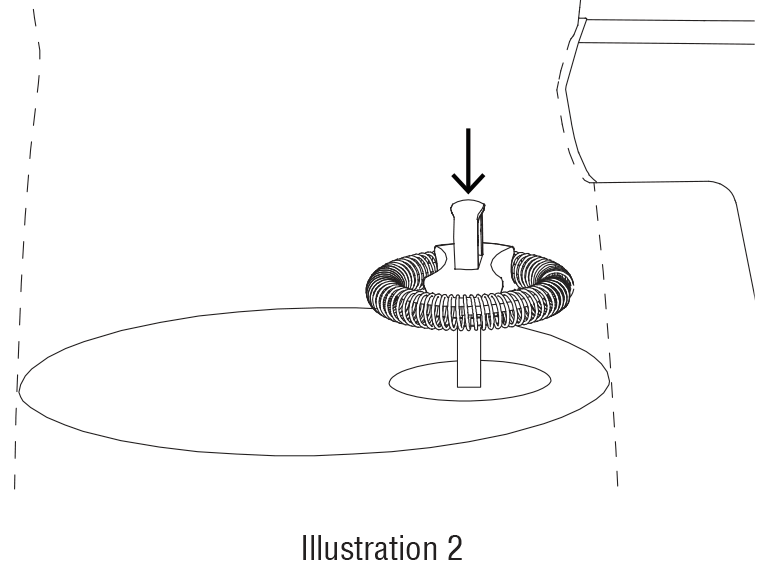
- 2. Open the lid, insert the whisk onto the post on the bottom of pitcher. Push the whisk until it’s secure in place. See illustration 2.
- 3. Fill the pitcher with 2 ⁄3 cup (150 mL) of water. Put the pitcher onto the power base.
- 4. Connect the plug into a power outlet.
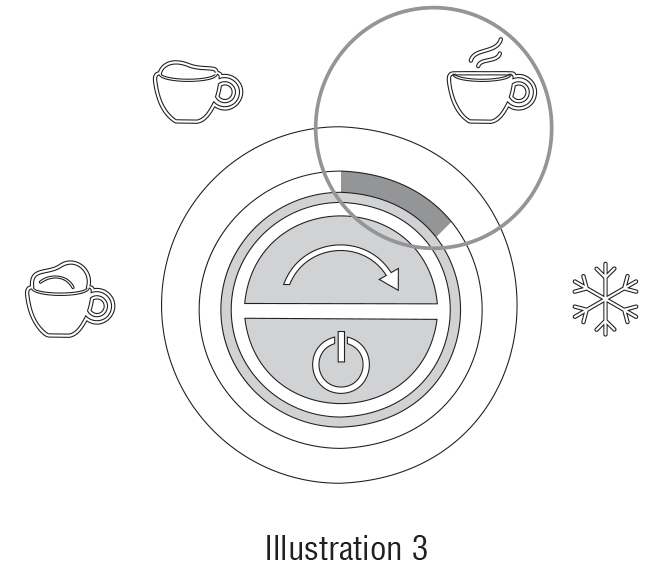
- 5. Press the Scroll button until “Warming Only” lights up. See illustration 3. Then, press the Start button; the appliance will begin to run. Note: During operation, you can cancel it anytime by pressing the Start button once.
- 6. When the appliance has stopped operating the light will turn off. Open the lid and pour out the warmed water.
- 7. Make sure cycle has ended. Then, unplug it from outlet. Caution: Never unplug while in use.
CAUTION: Allow the unit to rest a minimum of 5 minutes between cycles. Otherwise, the appliance will enter self-protection mode automatically. During this, the lights will flash, and the switch button won’t be activated. After several minutes, you can continue operating the appliance.
Note: Clean the jar between all cycles
Note: For best results, use whole or 2% milk.
Warm and High Foam
- 1. Place the appliance on a flat, dry, and stable surface.
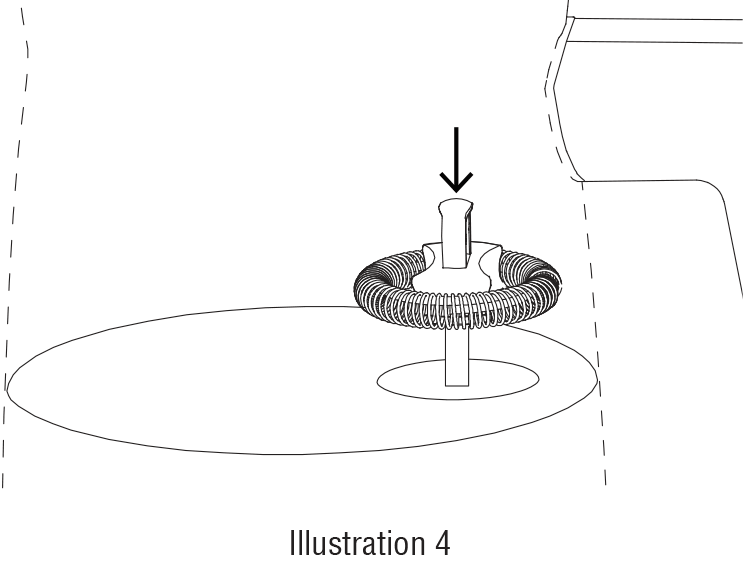
- 2. Then open the lid, insert the whisk onto the post on the bottom of pitcher. Push the whisk until it is secure in place. See illustration 4.
- 3. Fill the pitcher with the desired amount of milk and replace the lid. NOTE: Fill above MIN line but do not fill past MAX Froth line. Put the pitcher onto the power base.
- 4. Connect the plug into a power outlet.
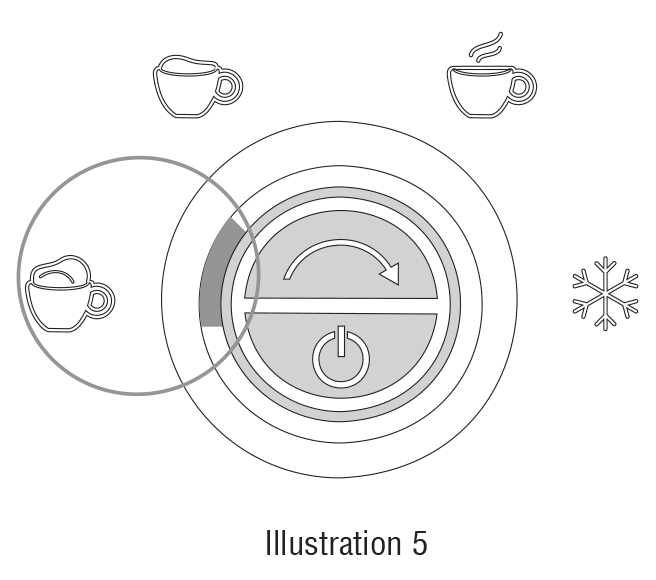
- 5. Press the Scroll button once, “Warm and high foam” will light up. See illustration 5. Then press the Start button, the appliance will begin to run. Note: During operation, you can cancel operating by pressing the Start button once.
- 6. When the appliance has stopped operating, the light will turn off. Open the lid, pour out the warmed and frothed milk to enjoy it.
- 7. Make sure cycle has ended then unplug from outlet. Caution: Never unplug while in use.
Warm and Low Foam
- 1. Place the appliance on a flat, dry, and stable surface.
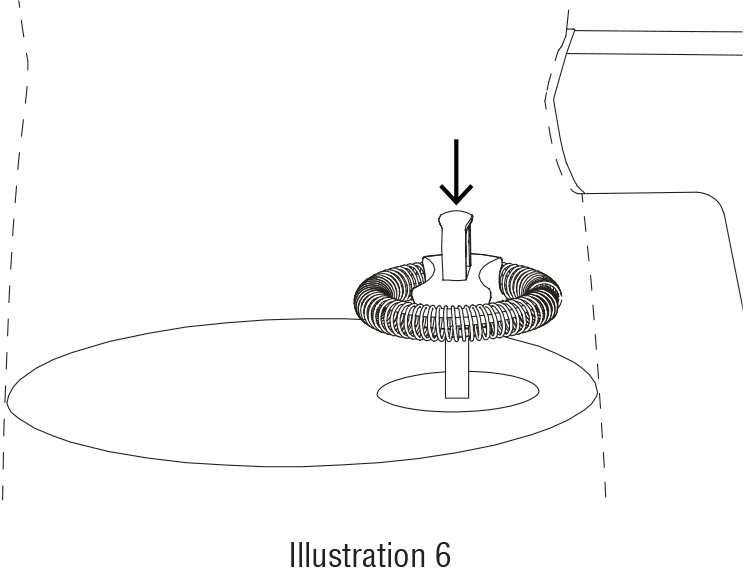
- 2. Then open the lid, insert the whisk onto the post on the bottom of pitcher. Push the whisk until it is secure in place. See illustration 6.
- 3. Fill the pitcher with the desired amount of milk and replace the lid. NOTE: Fill above MIN line but do not fill past MAX Froth line. Put the pitcher onto the power base.
- 4. Connect the plug into a power outlet.
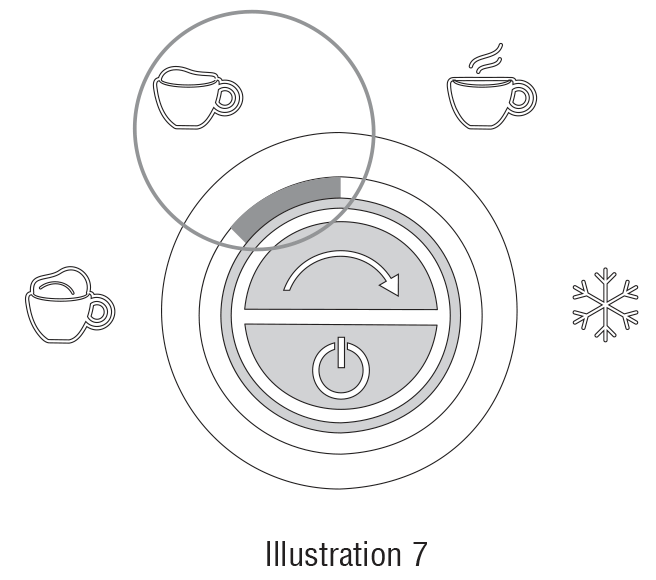
- 5. Press the Scroll button until “Warm and low foam” lights up. See illustration 7. Then press the Start button, the appliance will begin to run. Note: During operation, you can stop operating by pressing the Start button once.
- 6. When the appliance has stopped operating, the light will turn off. Open the lid, pour out the warmed and frothed milk to enjoy it.
- 7. Make sure cycle has ended then unplug from outlet. Caution: Never unplug while in use.
Warming Only
- 1. Place the appliance on a flat, dry, and stable surface.
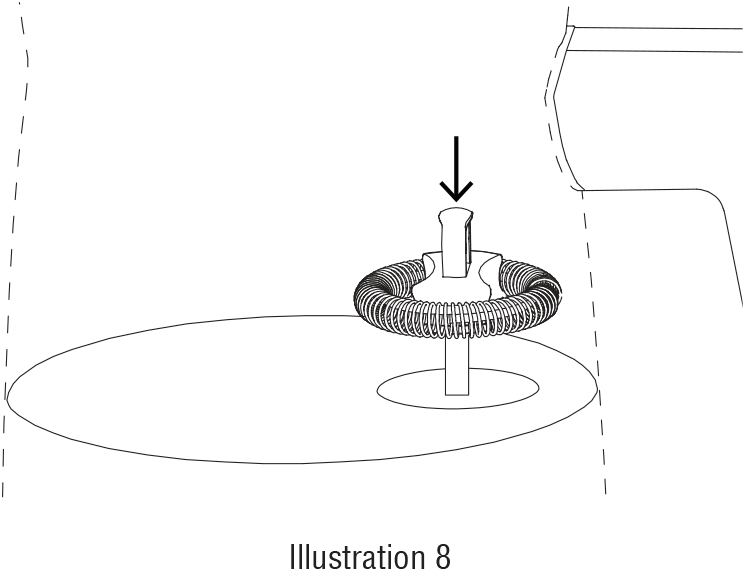
- 2. Then open the lid, insert the whisk onto the post on the bottom of pitcher. Push the whisk until it is secure in place. See illustration 8.
- 3. Fill the pitcher with the desired amount of milk and replace the lid. NOTE: Fill above MIN line but do not fill past MAX line. Put the pitcher onto the power base.
- 4. Connect the plug into a power outlet.
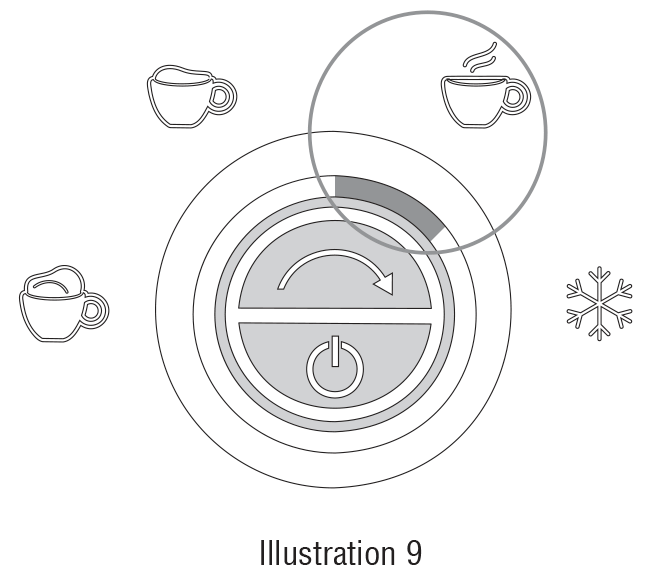
- 5. Press the Scroll button until “Warming only” lights up. See illustration 9. Then press the Start button, the appliance will begin to run. Note: During operation, you can stop operating by pressing the Start button once.
- 6. When the appliance has stopped operating, the light will turn off. Open the lid, pour out the warmed milk to enjoy it.
- 7. Make sure cycle has ended then unplug from outlet. Caution: Never unplug while in use.
Cold Foam
- 1. Place the appliance on a flat, dry, and stable surface.
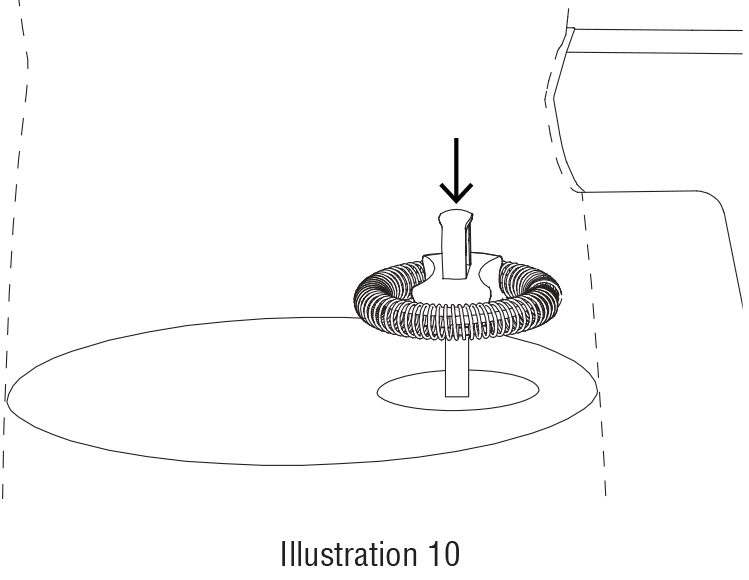
- 2. Then open the lid, insert the whisk onto the post on the bottom of pitcher. Push the whisk until it is secure in place. See illustration 10.
- 3. Fill the pitcher with the desired amount of milk and replace the lid. NOTE: Fill above MIN line but do not fill past MAX Froth line. Put the pitcher onto the power base.
- 4. Connect the plug into a power outlet.
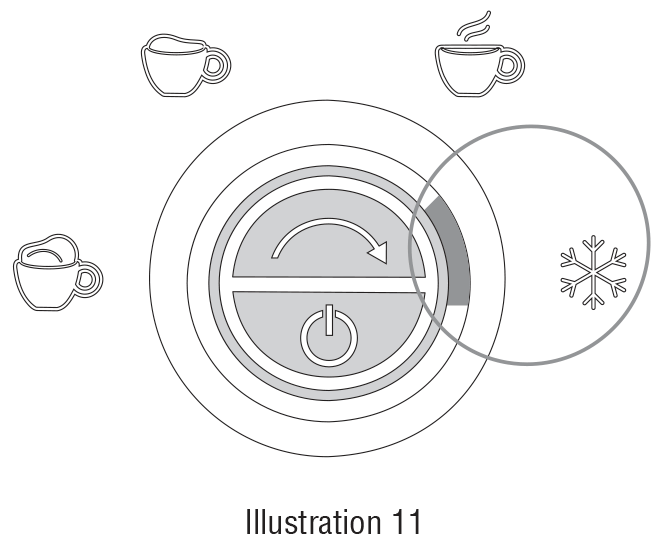
- 5. Press the Scroll button until “Cold Foam” lights up. See illustration 11. Then press the Start button, the appliance will begin to run. Note: During operation, you can stop operating by pressing the Start button once.
- 6. When the appliance has stopped operating, the light will turn off. Open the lid, pour out the frothed milk to enjoy it.
- 7. Make sure cycle has ended then unplug from outlet. Caution: Never unplug while in use.
TROUBLESHOOTING
Problem Possible Reason Solution There’s an odor when using for the first time This is common with electric appliances. Run water in unit (See Initial Test Run Section) several times.
If odor persists, call the Solution Center at (888) 687-2433 (United States) or (800) 342-2433 (Canada) for assistance.My milk did not froth. Alternative milk was used.
Not enough milk was used.Whole milk and 2% milk provide best results.
Make sure milk is above the minimum line and below the max lines. See details on p. 7.The frother is not starting. The pitcher is not on the base correctly.
Used too frequently.
Outlet is not working.Reposition the pitcher on the base.
The appliance will enter self-protection mode automatically. During this, the lights will flash and the switch button will not be activated. After several minutes, you can continue operating the appliance.
Check that your outlet is working with another appliance.My unit is not heating up. Outlet is not working.
Damage to the heating element.
Cold foam was selected.Check that your outlet is working with another appliance.
Call the Solution Center at (888) 687-2433 (United States) or (800) 342-2433 (Canada) for assistance.
Select a heating mode.GUARANTEE
- • Two-year guarantee for noncommercial use. Refer to our website or the sales receipt for details
Made in China
Guarantee
Use & Care
FREQUENTLY ASKED QUESTIONS
Q: Why do I need to complete the initial test run?
A: The initial test run will help you get familiar with your Electric Milk Frother while ensuring it performs at its best before you start using it.
Q: Why are there two maximum lines?
A: The first line is the Maximum Froth Line (which is closest to the bottom). Pour your milk to this line when using the High Foam, Low Foam, or Cold Foam settings. The second line is the Maximum Non-Froth Line, which you'd only use with the Warming Only setting.
Q: Which materials is this product made of?
A: The body, whisk, and base feature the following materials:
- Polypropylene
- Polyoxymethylene
- Stainless Steel
- ABS
Q: Can I take off the gasket on the lid for deep cleaning?
A: Yes, When you place the lid back on, make sure the fins are facing outward.
Q: Why didn't my milk froth?
A: Be sure you selected the correct setting. High Foam will give you the most froth and the Warming Only setting will not froth at all. Also, allow the unit to rest 5 minutes between each cycle for best foam results.
You should also check the type of milk you're using. While results vary by brand, fresh dairy milk produces the best results.
Q: What is the difference between the 4 settings?
A:
- High Foam: Make rich, thick foam. Try it with macchiatos and cappuccinos!
- Low Foam: Make light, airy foam and warm milk, Try it with lattes and cafe mochas!
- Warming Only: Make warmed milk with very light froth. Try it with cafe au laits and hot chocolate.
- Cold Foam: Make cafe-style cold foam. Try it with iced coffees and iced matchas!
Q: What is the capacity of the Electric Milk Frother?
A: The Minimum Line is 1/3 cup (75 mL), Max Froth line is 2/3 cup (150 mL), and Max Non-Froth Line is 1-1/3 cups (300 mL).
Q: Does the pitcher need to be on the base in a certain way?
A: No. The pitcher can be placed back onto the base in any direction.
Q: How does the Electric Milk Frother charge?
A: The Electric Milk Frother is a corded electric product that plugs in an outlet. See Safety & Use instructions for more details.
Q: Can I use flavoring in the Electric Milk Frother?
A: Yes, We recommend no more than 1 tbsp (15 mL) of thin syrup or 1/4 tsp (1 mL) of flavored extract. Don't add thick syrups like caramel sauce and chocolate syrup. Instead, drizzle these over your finished drinks!
You can also add a single-serving packet of hot chocolate mix when using the Warming Only setting.
Q: Which milk works best with this product?
A: Dairy milk works best. The fresher the better! Results will vary basd onthe type and brand of alternative or plant-based milks you use. Results may also vary with organic milk as well.
SAFETY AND USE INSTRUCTIONS
- Read, understand, follow, and save all Safety and Use Instructions to avoid injury.
WARNING
- • Read all instructions before using. When using electrical appliances, basic safety precautions should always be followed.
- • Adult supervision is required when using with children or persons with reduced physical, sensory, or mental capabilities or lack of experience and knowledge. Close supervision is necessary when any appliance is used by or near children. Children should be supervised to ensure that they DO NOT play with the appliance.
- • This appliance is not intended for use by persons (including children) with reduced physical, sensory, or mental capabilities, or lack of experience and knowledge, unless they are closely supervised and instructed concerning use of the appliance by a person responsible for their safety.
- • Choking Hazard. This product contains small parts which may constitute a choking or suffocation risk for small children. Adult supervision required.
- • Keep the unit and cord away from children. Never drape the cord over the edge of a counter, never use an outlet below the counter, and never use with a power strip or extension cord. DO NOT let cord hang over edge of table or counter or touch hot surfaces.
- • Avoid contact with any moving parts while in operation. Keep your hands, hair, clothing, spatulas, and other utensils away from the unit during operation to reduce the risk of injury to persons and/or damage to the unit.
- • DO NOT move the unit while in operation. This appliance only intended to be used for frothing and heating milk. DO NOT use this appliance for other than intended use.

- • DO NOT put foreign objects into gaps and crevices of the unit. It is prohibited to insert utensils or other foreign matter into gaps or crevices. This may cause electric shock or other dangerous accidents.
- • Keep hands and utensils out of this appliance while using to reduce the risk of severe injury to persons or damage to the frother.
- • DO NOT attempt to modify or repair the unit or any part inside, as this may cause electric shock, fire, melting, or injury.
- • Do not operate any appliance with a damaged cord or plug or after the appliance malfunctions or has been damaged in any manner. Call the Solution Center at (888) 687-2433 (United States) or (800) 342-2433 (Canada) for assistance.
- • DO NOT touch the hot surface. Use the handle or the button.
- • Contents will be hot after use. Use caution when pouring and consuming beverage.
- • DO NOT drink directly from the frother.
- • Extreme caution must be used when moving an appliance with hot liquid.
- • Do not place on or near a hot gas or electric burner, or in a heated oven.
- • To protect against electrical shock, DO NOT immerse or operate the unit, cord, or plugs in water or other liquid.
- • DO NOT operate the unit on an unstable or wet surface. Ensure that the appliance is used on a firm, dry, and flat surface out of reach of children, this will prevent the appliance from overturning and prevent damage or injury.
- • DO NOT use outdoors; intended for indoor countertop use only.
- • DO NOT let the cord touch hot surfaces.
- • When in use, DO NOT place the unit against a wall or against other appliances. Leave at least 6" (15 cm) of free space on the back and sides of the unit. DO NOT operate the unit on or near materials such as tablecloths, towels, curtains, etc. DO NOT place anything on top of the unit.
- • DO NOT pick up or remove pitcher off the power base while the frother is running.
- • Never add to container while appliance is operating. Stop appliance by pressing the “Start” button and then restart when ready.
- • Unplug from outlet when not in use and before cleaning. Remove from power base, allow to cool, remove lid, and empty pitcher before putting on or taking off parts, and before cleaning.
- • Only use accessories or attachments that are sold by Pampered Chef and are designed for use with this unit. DO NOT use accessories or attachments with, or in, non-approved appliances (such as an oven, microwave, stovetop, grill, etc.), as this may cause damage which can negatively affect performance of the unit.
- • DO NOT use the attached base other than for its intended use.
- • Avoid contacting moving parts.
- • This appliance can be used by children aged from 8 years and above if they have been given supervision or instruction concerning use of the appliance in a safe way and if they understand the hazards involved. Cleaning and user maintenance shall not be made by children unless they are older than 8 and supervised. Keep the appliance and its cord out of reach of children aged less than 8 years.
- • Scalding may occur if the lid is removed during the brewing cycles.
- • The use of non-Pampered Chef or non-approved accessories or attachments may cause injuries or damage to the unit. Any accessory or attachment that has been damaged in any manner must not be used.
- • Turn off the appliance by pressing the start button to stop operation if running and remove the plug from the wall outlet.
- • A short power-supply cord is provided to reduce risks resulting from becoming entangled in or tripping over a longer cord.
- • DO NOT use with thick syrups.
- • Save these instructions.
SAFEGUARDS
- • This appliance is for household use only; it is not intended for commercial use.
- • Never cover the air vents. Doing so may cause overheating and damage the unit. See parts illustration on page 6.
- • The unit should be placed so any steam does not vent directly onto the kitchen cabinets. Steam may damage cabinets.
- • Always operate the appliance with lid in place.
- • DO NOT use metal utensils as it will damage the interior coating.
- • DO NOT operate the appliance without liquid in it to avoid damaging the heat elements.
- • Clean after each use. Refer to the Cleaning section for proper maintenance.
- • Never connect this unit to an external timer switch or separate remote-control system.
- • DO NOT store the unit in direct sunlight.
ELECTRICAL HAZARDS
- • Persons with pacemakers or users of hearing aids or cochlear implants should consult with authorized medical personnel before use. Refer to the instructions of medical equipment providers.
- • Use only with a 120V 60Hz power outlet with a minimum power rating of 15A. Failure to follow can result in electrical shock, fire, or other serious injury.
- • Before connecting the appliance to the power outlet, check that the voltage indicated above corresponds with the voltage in your home. If this is not the case, contact a qualified electrician.
- • To protect against a fire, electric shock or personal injury, DO NOT immerse cord, electric plugs, pitcher or power base in water or other liquids.

- • This appliance has a polarized plug (one blade is wider than the other). To reduce the risk of electric shock, this plug is intended to fit into a polarized outlet only one way. If the plug does not fit fully into the outlet, reverse the plug. If it still does not fit, contact a qualified electrician. Do not attempt to modify the plug in any way.
- • DO NOT insert or remove the plug with wet hands. To avoid injuries due to electric shock, make sure your hands are dry before plugging and unplugging the unit.
- • Inspect the cord and unit for damage before each use.
- • If the plug fits loosely into the outlet, or if the outlet or plug feels warm, DO NOT use that outlet.
- • DO NOT use an adaptor or inverter with this appliance.
- • Always unplug the unit when not in use to prevent accidents (such as fire, electrical leakage, failure, etc.)
- • Never pull the cord to unplug the unit.
PARTS
A. Power Base
B. Feet
C. Lid
D. Lid Gasket
E. Pitcher
F. Handle
G. Whisk
H. Brush
DISPLAY

A. Start Button
B. Scroll Button
C. High Foam
D. Low Foam
E. Warming Only
F. Cold FoamCLEANING
Always disconnect the appliance from the power outlet and allow all parts to cool down before cleaning
CAUTION: DO NOT wash any parts in the dishwasher. Never immerse the pitcher, power base, or power cord in water, or allow moisture to come into contact with these parts. This may permanently damage the product and void the guarantee.
- • Lid, lid gasket, and whisk are hand wash only. Rinse thoroughly and dry.
- • Using the cleaning brush provided, wash the inside of the pitcher with a combination of a mild soap and water and then wipe clean with a soft damp towel.
- • Wipe the outside of pitcher and power base with a soft towel. DO NOT immerse in water.
- • DO NOT use household/commercial cleaners or scouring pads.
USE
BEFORE THE FIRST USE
- • Remove all the packaging.
- • Read all the instructions in this document.
- • Clean all parts. See the Cleaning section for instructions.
- • For any questions, call the Solution Center at (888) 687-2433 (United States) or (800) 342-2433 (Canada) for assistance.
- For best results, fill to the minimum line at least. To prevent overflowing, DO NOT fill past the maximum froth and maximum heat lines shown in illustration 1.
- Minimum Line: ⅓ cup (75 mL)
- Maximum Froth Line: ⅔ cup (150 mL)
- Maximum Non-Froth Line: 1⅓ cups (300 mL)

Initial Test Run
- 1. Place the appliance on a flat, dry, and stable surface.
- 2. Open the lid, insert the whisk onto the post on the bottom of pitcher. Push the whisk until it’s secure in place. See illustration 2.
- 3. Fill the pitcher with 2 ⁄3 cup (150 mL) of water. Put the pitcher onto the power base.
- 4. Connect the plug into a power outlet.
- 5. Press the Scroll button until “Warming Only” lights up. See illustration 3. Then, press the Start button; the appliance will begin to run. Note: During operation, you can cancel it anytime by pressing the Start button once.
- 6. When the appliance has stopped operating the light will turn off. Open the lid and pour out the warmed water.
- 7. Make sure cycle has ended. Then, unplug it from outlet. Caution: Never unplug while in use.
CAUTION: Allow the unit to rest a minimum of 5 minutes between cycles. Otherwise, the appliance will enter self-protection mode automatically. During this, the lights will flash, and the switch button won’t be activated. After several minutes, you can continue operating the appliance.
Note: Clean the jar between all cycles
Note: For best results, use whole or 2% milk.


Warm and High Foam
- 1. Place the appliance on a flat, dry, and stable surface.
- 2. Then open the lid, insert the whisk onto the post on the bottom of pitcher. Push the whisk until it is secure in place. See illustration 4.
- 3. Fill the pitcher with the desired amount of milk and replace the lid. NOTE: Fill above MIN line but do not fill past MAX Froth line. Put the pitcher onto the power base.
- 4. Connect the plug into a power outlet.
- 5. Press the Scroll button once, “Warm and high foam” will light up. See illustration 5. Then press the Start button, the appliance will begin to run. Note: During operation, you can cancel operating by pressing the Start button once.
- 6. When the appliance has stopped operating, the light will turn off. Open the lid, pour out the warmed and frothed milk to enjoy it.
- 7. Make sure cycle has ended then unplug from outlet. Caution: Never unplug while in use.


Warm and Low Foam
- 1. Place the appliance on a flat, dry, and stable surface.
- 2. Then open the lid, insert the whisk onto the post on the bottom of pitcher. Push the whisk until it is secure in place. See illustration 6.
- 3. Fill the pitcher with the desired amount of milk and replace the lid. NOTE: Fill above MIN line but do not fill past MAX Froth line. Put the pitcher onto the power base.
- 4. Connect the plug into a power outlet.
- 5. Press the Scroll button until “Warm and low foam” lights up. See illustration 7. Then press the Start button, the appliance will begin to run. Note: During operation, you can stop operating by pressing the Start button once.
- 6. When the appliance has stopped operating, the light will turn off. Open the lid, pour out the warmed and frothed milk to enjoy it.
- 7. Make sure cycle has ended then unplug from outlet. Caution: Never unplug while in use.


Warming Only
- 1. Place the appliance on a flat, dry, and stable surface.
- 2. Then open the lid, insert the whisk onto the post on the bottom of pitcher. Push the whisk until it is secure in place. See illustration 8.
- 3. Fill the pitcher with the desired amount of milk and replace the lid. NOTE: Fill above MIN line but do not fill past MAX line. Put the pitcher onto the power base.
- 4. Connect the plug into a power outlet.
- 5. Press the Scroll button until “Warming only” lights up. See illustration 9. Then press the Start button, the appliance will begin to run. Note: During operation, you can stop operating by pressing the Start button once.
- 6. When the appliance has stopped operating, the light will turn off. Open the lid, pour out the warmed milk to enjoy it.
- 7. Make sure cycle has ended then unplug from outlet. Caution: Never unplug while in use.


Cold Foam
- 1. Place the appliance on a flat, dry, and stable surface.
- 2. Then open the lid, insert the whisk onto the post on the bottom of pitcher. Push the whisk until it is secure in place. See illustration 10.
- 3. Fill the pitcher with the desired amount of milk and replace the lid. NOTE: Fill above MIN line but do not fill past MAX Froth line. Put the pitcher onto the power base.
- 4. Connect the plug into a power outlet.
- 5. Press the Scroll button until “Cold Foam” lights up. See illustration 11. Then press the Start button, the appliance will begin to run. Note: During operation, you can stop operating by pressing the Start button once.
- 6. When the appliance has stopped operating, the light will turn off. Open the lid, pour out the frothed milk to enjoy it.
- 7. Make sure cycle has ended then unplug from outlet. Caution: Never unplug while in use.


TROUBLESHOOTING
Problem Possible Reason Solution There’s an odor when using for the first time This is common with electric appliances. Run water in unit (See Initial Test Run Section) several times.
If odor persists, call the Solution Center at (888) 687-2433 (United States) or (800) 342-2433 (Canada) for assistance.My milk did not froth. Alternative milk was used.
Not enough milk was used.Whole milk and 2% milk provide best results.
Make sure milk is above the minimum line and below the max lines. See details on p. 7.The frother is not starting. The pitcher is not on the base correctly.
Used too frequently.
Outlet is not working.Reposition the pitcher on the base.
The appliance will enter self-protection mode automatically. During this, the lights will flash and the switch button will not be activated. After several minutes, you can continue operating the appliance.
Check that your outlet is working with another appliance.My unit is not heating up. Outlet is not working.
Damage to the heating element.
Cold foam was selected.Check that your outlet is working with another appliance.
Call the Solution Center at (888) 687-2433 (United States) or (800) 342-2433 (Canada) for assistance.
Select a heating mode.GUARANTEE
- • Two-year guarantee for noncommercial use. Refer to our website or the sales receipt for details
Made in China
Guarantee


 United States (en)
 Germany (de)
 Austria (de)
 France (fr)
