

 United States (en)
 Germany (de)
 Austria (de)
 France (fr)
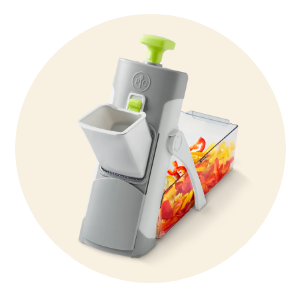


Easy Roll Maker

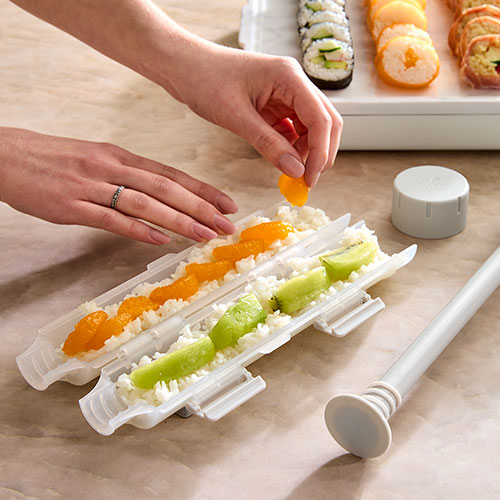
FAMILY-FRIENDLY SUSHI MAKER BRINGS FUN AND FLAVOR
This quality roll maker lets you create a variety of delicious rolls—no raw fish required. That could be classic California rolls, veggie-packed options, cooked proteins, and even sweet dessert rolls. Ready for more? Easily build sushi favorites using sticky sushi rice, your favorite fillings, and nori sheets. Just roll and slice for restaurant-style results at home.
When you’re in the mood for a sweet snack, try frushi. These fruit-filled rolls are made with coconut rice and colorful fruit, delivering a dessert-style treat that kids (and grown-ups) love. It’s simple, mess-free, and turns what could be a complicated cooking project into a fun activity.
WHY YOU’LL LOVE IT
- See-through barrel lets you watch rolls come together perfectly every time.
- Easy-close latches keep the barrel secure, so rolling stays mess-free.
- Dishwasher-safe design makes cleanup quick.
Guarantee
- 3-year guarantee
Product Details
- Includes the plunger rod, pusher plate, knob, end cap, latches, and barrel.
- Makes one roll ready for slicing.
- Dishwasher-safe
- 11½" (29 cm)
- Made of plastic and silicone
WAYS TO USE
The Easy Roll Maker works great with traditional sushi rice, standard long-grain white rice, and even flavored rice mixes like Cilantro Lime Rice Mix and Indian-Style Rice Meal Mix.
For more ideas on getting started and getting creative, check out these blogs:
Sushi Night at Home
Creative Sushi Roll Ideas the Whole Family Will Love
-
Use & Care
Use & Care
Use & Care
SAFETY AND USE INSTRUCTIONS
- Read, understand, follow, and save all Safety and Use Instructions to avoid injury.
WARNING
- • Adult supervision is required when using with children or persons with reduced physical, sensory, or mental capabilities or lack of experience and knowledge.
- • Choking hazard: This product contains small parts.
SAFEGUARDS
- • Not microwave-safe.
- • Freezer- and refrigerator-safe.
- • This unit is for household use only; it is not intended for commercial use.
- • Do not use with cookie or heavy doughs.
- • Do not overfill the Barrel during use.
PARTS
A. Well
B. Plunger Rod
C. Pusher Plate
D. Knob
E. End Cap
F. Latches
G. Barrel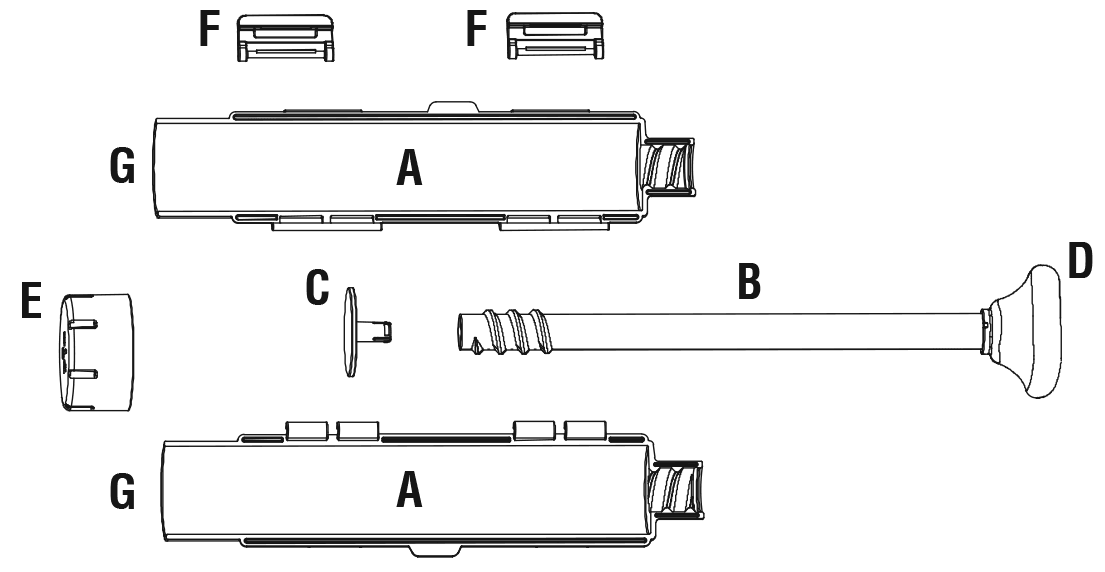
CLEANING
- • Wash before using for the first time; dishwasher-safe when placed away from the heating element
USE AND CARE
• Note: For best results, use sushi rice.
To Use:
- 1. Open the Barrel and remove the Plunger Rod. Lightly oil the inside of each Well. Wet your hands to help handle the rice better. Pack the sushi rice mixture evenly into each Well until it’s flush with the side of the Barrel, about ½ cup (125 mL) per well. See illustration 1.
- 2. Take the Plunger Rod and lay it in the center of one half of the rice. Press down firmly, making sure that the Pusher Plate is in position at the screw thread end. Repeat for the other half. This will provide a neat, straight groove. Lay your ingredients into the grooves. See illustration 2. Tip: Do not overfill. Ensure the rice and add-ins do not go above the rim of the Wells.


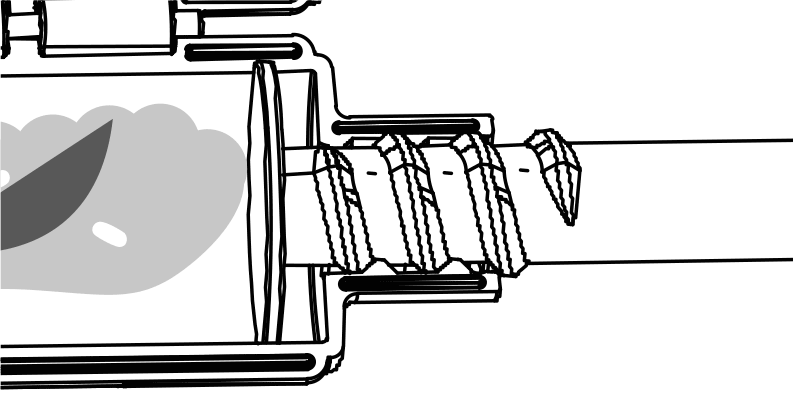

- 3. Place the Plunger into the thread end in the screw channel with the Pusher Plate against the end of the thread. See illustration 3.
- 4. Gently close the two halves together, starting at a 45-degree angle. Tip: Close the two halves together quickly, so food doesn’t fall out.
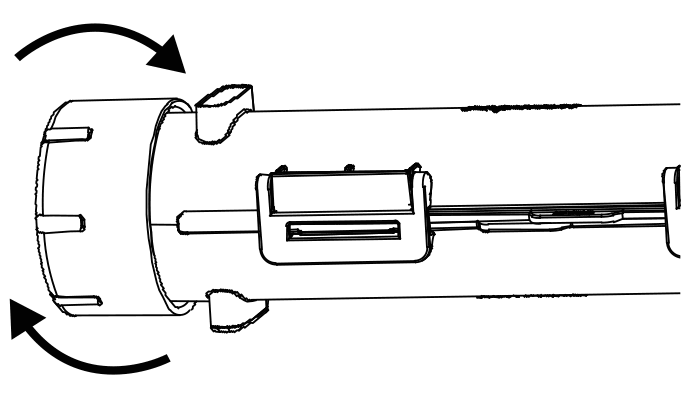
- 5. Clip the latches shut. Attach the end cap by lining up the marks and make sure it is secure by twisting to lock in place. See illustration 4.
- 6. Hold the Barrel in one hand and turn the Plunger Knob until you feel there are no more threads (this gently compresses the rice to a stop). See illustration 5.
- 7. Twist the end cap to unlock and remove the end cap.
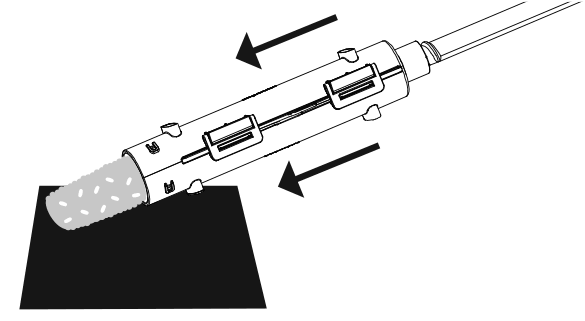
- 8. On a bench or tabletop, place a nori sheet, glossy side down, with the long edge closest to you. By pushing the plunger through, position the newly formed rice roll on to the nori sheet with the end of the rice roll lining up with the end of the nori sheet. See illustration 6.
- Tip: Hold the Plunger Rod still and push the Barrel when extruding rice roll.
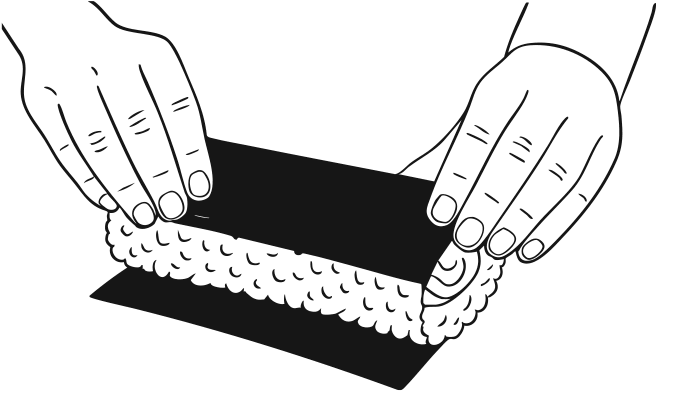
- 9. Roll up the nori sheet. Wet the nori sheet at the joining end with a little water to ensure it sticks. See illustration 7.
- 10. For easier slicing, chill the roll for up to 15 minutes. Moisten the blade of a sharp knife with water. Slice through. Wipe the blade of the knife clean after each cut.
GUARANTEE
- • Three-year guarantee for noncommercial use. Refer to our website or the sales receipt for details.
Guarantee
Use & Care
SAFETY AND USE INSTRUCTIONS
- Read, understand, follow, and save all Safety and Use Instructions to avoid injury.
WARNING
- • Adult supervision is required when using with children or persons with reduced physical, sensory, or mental capabilities or lack of experience and knowledge.
- • Choking hazard: This product contains small parts.
SAFEGUARDS
- • Not microwave-safe.
- • Freezer- and refrigerator-safe.
- • This unit is for household use only; it is not intended for commercial use.
- • Do not use with cookie or heavy doughs.
- • Do not overfill the Barrel during use.
PARTS
A. Well
B. Plunger Rod
C. Pusher Plate
D. Knob
E. End Cap
F. Latches
G. BarrelCLEANING
- • Wash before using for the first time; dishwasher-safe when placed away from the heating element
USE AND CARE
• Note: For best results, use sushi rice.
To Use:
- 1. Open the Barrel and remove the Plunger Rod. Lightly oil the inside of each Well. Wet your hands to help handle the rice better. Pack the sushi rice mixture evenly into each Well until it’s flush with the side of the Barrel, about ½ cup (125 mL) per well. See illustration 1.
- 2. Take the Plunger Rod and lay it in the center of one half of the rice. Press down firmly, making sure that the Pusher Plate is in position at the screw thread end. Repeat for the other half. This will provide a neat, straight groove. Lay your ingredients into the grooves. See illustration 2. Tip: Do not overfill. Ensure the rice and add-ins do not go above the rim of the Wells.
- 3. Place the Plunger into the thread end in the screw channel with the Pusher Plate against the end of the thread. See illustration 3.
- 4. Gently close the two halves together, starting at a 45-degree angle. Tip: Close the two halves together quickly, so food doesn’t fall out.
- 5. Clip the latches shut. Attach the end cap by lining up the marks and make sure it is secure by twisting to lock in place. See illustration 4.
- 6. Hold the Barrel in one hand and turn the Plunger Knob until you feel there are no more threads (this gently compresses the rice to a stop). See illustration 5.
- 7. Twist the end cap to unlock and remove the end cap.
- 8. On a bench or tabletop, place a nori sheet, glossy side down, with the long edge closest to you. By pushing the plunger through, position the newly formed rice roll on to the nori sheet with the end of the rice roll lining up with the end of the nori sheet. See illustration 6.
- Tip: Hold the Plunger Rod still and push the Barrel when extruding rice roll.
- 9. Roll up the nori sheet. Wet the nori sheet at the joining end with a little water to ensure it sticks. See illustration 7.
- 10. For easier slicing, chill the roll for up to 15 minutes. Moisten the blade of a sharp knife with water. Slice through. Wipe the blade of the knife clean after each cut.
GUARANTEE
- • Three-year guarantee for noncommercial use. Refer to our website or the sales receipt for details.
Guarantee


