

 United States (en)
 Germany (de)
 Austria (de)
 France (fr)
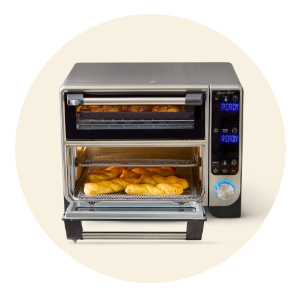


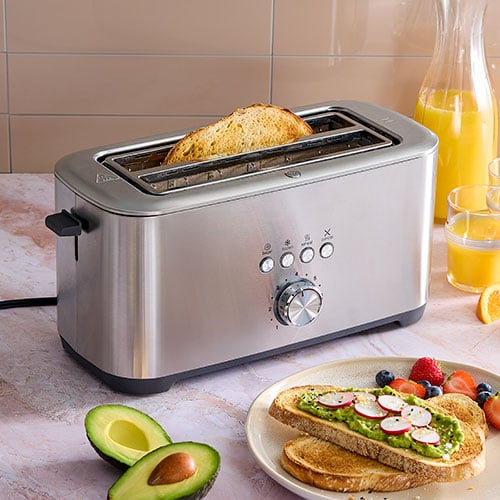


4-Slice Toaster With Warming Rack

MAKE THE MOST OF YOUR TOAST
Our 4-slice stainless steel toaster is built for busy days, with extra-long, extra-wide slots that welcome everything from artisanal loaves to bagels, English muffins to Texas toast. Seven browning settings put you in control, so every slice comes out just the way you like it (no more “That’s the wrong color” from the picky crowd!). Our bonus warming rack keeps buns and rolls perfectly toasty, cafe-style, without over-browning.
Four smart functions put you in control: Bagel, Defrost, Reheat, and Cancel. Whether your bread is fresh, frozen, or already toasted, it comes out just right. Defrost takes bread and waffles from frosty to golden in one step while Reheat warms cooled toast without extra browning. And the Bagel setting? It crisps the cut side while gently warming the outside because they deserve special treatment.
Thoughtful details make your day easier. Built-in cord storage keeps counters tidy, a removable crumb tray allows for easy cleanup, and a high-lift lever ensures safe, easy removal making this toaster ready for weekday breakfasts, weekend brunches, and busy dinnertimes. Perfect toast, warm buns, happy family.
WHY YOU’LL LOVE IT
- 4-slice extra-long slots easily fit thick artisanal bread, bagels, sandwich bread, and waffles.
- 4 functions make toasting convenient for perfect results every time.
- 7-shade settings to customize from lightly golden to deep brown for toast just the way you like it.
- Bonus bun warming rack gently warms buns, croissants, and pastries for a café-style experience.
- Cord storage and removable crumb tray keep your kitchen neat
Guarantee
- 2-year guarantee
Product Details
- Toaster, warming rack, and Getting Started card.
- Up to four slices of toast.
- Hand wipe the toaster, crumb tray, and bun warmer to clean.
- 16½" x 7 1/3" x 7½" (42 cm x 18.5 cm x 19 cm).
- Made of stainless steel, silicone, and plastic.
WAYS TO USE
- Can also be used to toast slices of your favorite Pampered Chef bread mixes.
-
Use & Care
Use & Care
Use & Care
SAFETY AND USE INSTRUCTIONS
When using electrical appliances, basic safety precautions should always be followed, including:
WARNING
- 1. Read all instructions.
- 2. This appliance is not intended for use by persons (including children) with reduced physical, sensory, or mental capabilities, or lack of experience and knowledge, unless they are closely supervised and instructed concerning use of the appliance by a person responsible for their safety. Close supervision is necessary when any appliance is used by or near children.
- 3. Children must be supervised to ensure that they DO NOT play with the appliance.
4. DO NOT touch hot surfaces. Toaster gets hot during and after operation. To prevent burns or personal injury, ALWAYS use protective hot pads or insulated oven mitts and use available levers. Keep all body parts out of and away from the appliance during and after operation. 
5. Prevent food contact with Heating Elements. Excessive amounts of food, oversized foods, metal utensils, foil, or metal foil packages must not be inserted in the appliance as they may create a fire, risk of electric shock, or injury. - 6. To protect against electrical shock, do not immerse cord, plug, or any part of the Toaster in water or other liquids.
- 7. Allow to cool before removing or installing the Crumb Tray, and before cleaning the appliance.
- 8. Failure to clean Crumb Tray may result in a fire hazard.
- 9. Unplug the appliance from outlet when not in use to prevent accidents (such as fire, electrical leakage, failure, etc.) and before cleaning.
10. Before unplugging the appliance, make sure the Toaster Lever is in the “up” position. Never pull on the Cord to disconnect the Toaster from the electrical outlet; instead, grasp the Plug and pull on the plug to disconnect the Toaster. - 11. If the appliance, Cord, or Plug has been damaged in any manner, immediately discontinue use of the appliance. For any questions, call the Solution Center at (888) 687-2433 (United States) or (800) 342-2433 (Canada).
- 12. DO NOT place any of the following materials in the Toaster: paper, cardboard, plastic, toasting bags, metal objects (i.e. fork), etc.
- 13. Do not let the cord hang over the edge of a table or counter or touch hot surfaces.
- 14. Do not place on or near heat sources, a hot gas or electric burner, or in a heated oven.
- 15. Do not use the appliance for anything other than its intended use.
- 16. Do not use outdoors.
17. Toasters must not be used near or below combustible materials including, but not limited, to curtains, draperies, and the like, when in operation as it may cause fire, electric shock, or injury. 
18. When in use, DO NOT place the appliance against a wall, cabinet, or against other appliances. Leave at least 6" (15 cm) of free space on the back, top, and sides of the appliance. A fire may occur if the appliance is covered or touching flammable material, including curtains, draperies, walls, and the like, when in operation. Do not store any item on top of the appliance when in operation. - 19. A fire may occur if Toaster is operated in an enclosed space, such as an appliance cabinet, caddy, garage, or other storage area.
- 20. Should the appliance emit heavy smoke, press Cancel and unplug immediately. Wait until it stops smoking before removing food. Then clean thoroughly.
- 21. Do not cover the vents (see parts diagram) while unit is operating. Doing so will prevent even cooking and may damage the unit or cause it to overheat.
- 22. Do not clean with metal scouring pads. Pieces can break off the pad and touch electrical parts, creating a risk of electric shock.
- 23. The use of accessory attachments not recommended by Pampered Chef may cause injuries.
24. DO NOT put foreign objects into gaps and crevices of the appliance. DO NOT insert utensils or other foreign matter into gaps or crevices. This may cause electric shock or other dangerous accidents. - 25. Never attempt to remove food jammed in the slots without unplugging the appliance from the electrical outlet first. Be sure not to damage the internal mechanism or Heating Elements when removing food.
- 26. DO NOT operate the appliance on an unstable or wet surface. Always operate the appliance on a dry, stable, non-combustible, level surface.
- 27. Be sure to take the food out carefully after toasting to avoid injuries.
- 28. Do not operate unattended.
29. Never use the Toaster on its side. Always use it in upright position. - 30. DO NOT move the unit while in operation. Make sure the unit is unplugged and cooled to room temperature before moving.
31. Avoid toasting foods with frostings or fillings that may run or that are made with open fillings. Frosting and fillings can catch fire. - 32. Do not toast pastries, tarts, and the like at any setting other than the lowest or lightest setting and never toast twice, as these items can ignite if overheated and cause fire.
- 33. Do not use with rice cakes, fried foods, frozen prepared foods, or non-bread items.
SAFEGUARDS
- 1. This appliance is for household use only; it is not intended for commercial use.
- 2. Clean frequently. Refer to the Cleaning section for proper maintenance.
- 3. DO NOT use Toaster as a source of non-cooking heat or for drying.
- 4. Be sure the outlet is designated for just this appliance and has nothing else plugged into it. Make sure not to use another appliance that is on the same circuit as that outlet at the same time as the Toaster.
- 5. Never toast food with extremely runny or loose ingredients such as butter, liquid, sugar, cheese, etc. See illustration 1.
- 6. Never connect this unit to an external timer switch, smart plug, or separate remote-control system.
- 7. The appliance should be placed so that any steam does not vent directly onto the kitchen cabinets. Steam may damage cabinets or shelves. 8. DO NOT store the unit in direct sunlight.
- 9. DO NOT use bread greater than 1" (2.5 cm) in thickness and 9" (23 cm) in length in Toaster Slots. Toast larger breads and buns on the Warming Rack.
- 10. Do not use the Warming Rack for anything other than larger breads and buns. See illustration 2.
- 11. DO NOT operate the appliance adjacent to or inside sinks and other sources of water.
- 12. Position the appliance away from any overhangs, walls, and table or countertop edges.
- 13. DO NOT insert or remove the plug with wet hands. To avoid injuries due to electric shock, make sure your hands are dry before plugging and unplugging the unit.
- 14. DO NOT use an adaptor, extension cord, or inverter with this appliance.
- 15. If you want to stop the Toaster and Cancel button does not work, unplug the unit.
ELECTRICAL HAZARDS
When using electrical appliances, basic safety precautions should always be followed including the following:
1. This appliance has a polarized plug (one blade is wider than the other). To reduce the risk of electric shock, this plug will fit in a polarized outlet only one way. If the plug does not fit fully into the outlet, reverse the plug. If it still does not fit, contact a qualified electrician. Do not modify the plug in any way. - 2. Use only with a 120V 60Hz power outlet with a minimum power rating of 15A. Failure to follow can result in electrical shock, fire, or other serious injury.
- 3. Make sure that your outlet voltage corresponds to the voltage stated on the rating label of the Toaster.
- 4. A short power-supply cord is provided to reduce risks resulting from becoming entangled in or tripping over a long cord.
- 5. If the plug fits loosely into the outlet, or if the outlet or plug feels warm, DO NOT use that outlet.
PARTS
A. Shade Knob
B. Warming Rack Lever
C. Warming Rack
D. Toaster Lever
E. Toaster Slots (x2)
F. Crumb Tray
G. Display
H. Bagel
I. Frozen
J. Reheat
K. Cancel
L. Vents
CLEANING
- 1. Unplug the appliance and allow it to cool before cleaning.
- 2. Wipe the outside with soft dry cloth. Never use abrasive metal polish.
- 3. Crumb Tray:
- • Remove the Crumb Tray on bottom of the Toaster and empty it. To remove the tray, push in on tray. Replace the same way.
- • WARNING: If the Toaster is used frequently, accumulated breadcrumbs must be removed and cleaned frequently. Failure to clean the Crumb Tray may result in a fire hazard.
- • To clean the Crumb Tray, empty contents into garbage. Wipe with a soft dry cloth.
- • Make sure the Crumb Tray is completely installed and flush with the Toaster before using the Toaster again. See illustration 3.
- Note: Some fingerprints may appear on the outside of the Toaster. This is considered normal.
USE AND CARE
IMPORTANT BEFORE USE
Before first use:
- • Remove all packaging. Make sure all parts are present and accounted for.
- • Read all instructions in this document.
- • Clean all parts. See the Cleaning section for instructions.
- • For any questions, call the Solution Center at (888) 687-2433 (United States) or (800) 342-2433 (Canada).
INITIAL TEST RUN
- Note: As there is manufacturing residue or oil remaining in the Toaster or heating element, it usually emits the odor for the first use. It is normal and will not occur after the first several uses. Before the first use of the Toaster, it is required to operate the appliance without food:
- Note: Make sure the Crumb Tray is completely inserted in place before using.
- 1. Insert the power plug into a 120V 60Hz power outlet with a minimum 15A power supply.
- 2. Set the toasting shade to level 1 by turning the Shade Knob.
- 3. Press Toaster Lever down vertically until it clicks into place. Note: The Cancel button will be illuminated. Once finished, the Toaster Lever will automatically pop up.
To Use Toaster:
- 1. Insert the power plug into a 120V 60Hz power outlet with a minimum 15A power supply.
- 2. Make sure the Crumb Tray is completely inserted in place before using.
- 3. Put bread slice into the bread slot. Toaster has a capacity of 4 typical bread slices. NOTE: Do not use with bread greater than 1" (2.5 cm) in thickness and 9" (23 cm) in length in the Toaster Slots. Do not use with breads shorter than 2" (5 cm). See illustration 1. Toast larger breads and buns on the Warming Rack.
- 4. Set the toasting color by turning Shade Knob to your desired color. There are 7 shade levels (1=lightest, 7=darkest). Turn clockwise to increase shade level and turn counterclockwise to decrease shade level.
- 5. Press the Toaster Lever down vertically until it clicks into place. Note: The Cancel button will be illuminated. Once finished, the Toaster Lever will automatically pop up.
Note:
- • To help remove the toast, lift the Toaster Lever up. See illustration 2.
- • Two slices of bread in the same slot will be slightly darker than two slices of bread in two different slots.
- • Toasting shade will increase with multiple consecutive toasting cycles.
- • The Toaster Lever can only be used when the appliance is plugged in.
- • If the toasting shade is satisfactory, you may end the toasting process by pressing the Cancel button at any time.
Frozen Button:
- Frozen Button: Use this setting if the bread has been taken out from refrigerator or freezer.
- 1. Insert the power plug into 120V 60Hz power outlet and make sure the Crumb Tray is in place.
- 2. Set Shade Knob to your desired shade. Press the Toaster Lever down vertically until it clicks into place, then press the Frozen button (both the Frozen and Cancel buttons will be illuminated). Note: If the toasting shade is satisfactory, you may end the toasting process by pressing the Cancel button at any time.
Reheat Button:
- Reheat Button: Use this setting if you want to warm room-temperature toasted bread.
- 1. Insert the power plug into 120V 60Hz power outlet and make sure the Crumb Tray is in place.
- 2. Press the Toaster Lever down vertically until it clicks into place, then press the Reheat button (both the Reheat and Cancel buttons will be illuminated). Note: Reheating time in this mode is fixed, so the Shade Knob does not work with this setting.
Bagel Button:
- Use this setting if you only want to toast one side of the bagel slice. Note: Place bagel cut side facing out in this setting. See illustration 3.
- 1. Insert the power plug into 120V 60Hz power outlet and make sure the Crumb Tray is in place.
- 2. Set the Shade Knob to your desired color, press the Toaster Lever down vertically until it clicks into place, then press the Bagel button (both the Bagel and Cancel buttons will be illuminated).
- 3. Once the bread has been toasted to the preset color, the Toaster Lever will automatically pop up. Note: If the toasting shade is satisfactory, you may end the toasting process by pressing the Cancel button at any time.
Warming Rack:
- Warming Rack: Use this setting to toast buns.
- 1. Insert the power plug into 120V 60Hz power outlet and make sure the Crumb Tray is in place.
- 2. Press the Warming Rack Lever down vertically until it latches into place. The Warming Rack will pop up. See illustration 4.
- 3. Place the buns on top of the Warming Rack with the side you want toasted face down.
- 4. Set the Shade Knob to your desired color then press the Toaster Lever down vertically until it clicks into place.
Note: It is recommended to start at shade 3.
Note: Once the bread has been toasted to the preset color, the Toaster Lever will automatically pop up.
Note: If the toasting shade is satisfactory, you may end the toasting process by pressing the Cancel button at any time.
GUARANTEE
- • Two-year guarantee for noncommercial use. Refer to our website or the sales receipt for details.
Guarantee
Use & Care
SAFETY AND USE INSTRUCTIONS
When using electrical appliances, basic safety precautions should always be followed, including:
WARNING
- 1. Read all instructions.
- 2. This appliance is not intended for use by persons (including children) with reduced physical, sensory, or mental capabilities, or lack of experience and knowledge, unless they are closely supervised and instructed concerning use of the appliance by a person responsible for their safety. Close supervision is necessary when any appliance is used by or near children.
- 3. Children must be supervised to ensure that they DO NOT play with the appliance.
4. DO NOT touch hot surfaces. Toaster gets hot during and after operation. To prevent burns or personal injury, ALWAYS use protective hot pads or insulated oven mitts and use available levers. Keep all body parts out of and away from the appliance during and after operation. 5. Prevent food contact with Heating Elements. Excessive amounts of food, oversized foods, metal utensils, foil, or metal foil packages must not be inserted in the appliance as they may create a fire, risk of electric shock, or injury. - 6. To protect against electrical shock, do not immerse cord, plug, or any part of the Toaster in water or other liquids.
- 7. Allow to cool before removing or installing the Crumb Tray, and before cleaning the appliance.
- 8. Failure to clean Crumb Tray may result in a fire hazard.
- 9. Unplug the appliance from outlet when not in use to prevent accidents (such as fire, electrical leakage, failure, etc.) and before cleaning.
10. Before unplugging the appliance, make sure the Toaster Lever is in the “up” position. Never pull on the Cord to disconnect the Toaster from the electrical outlet; instead, grasp the Plug and pull on the plug to disconnect the Toaster. - 11. If the appliance, Cord, or Plug has been damaged in any manner, immediately discontinue use of the appliance. For any questions, call the Solution Center at (888) 687-2433 (United States) or (800) 342-2433 (Canada).
- 12. DO NOT place any of the following materials in the Toaster: paper, cardboard, plastic, toasting bags, metal objects (i.e. fork), etc.
- 13. Do not let the cord hang over the edge of a table or counter or touch hot surfaces.
- 14. Do not place on or near heat sources, a hot gas or electric burner, or in a heated oven.
- 15. Do not use the appliance for anything other than its intended use.
- 16. Do not use outdoors.
17. Toasters must not be used near or below combustible materials including, but not limited, to curtains, draperies, and the like, when in operation as it may cause fire, electric shock, or injury. 18. When in use, DO NOT place the appliance against a wall, cabinet, or against other appliances. Leave at least 6" (15 cm) of free space on the back, top, and sides of the appliance. A fire may occur if the appliance is covered or touching flammable material, including curtains, draperies, walls, and the like, when in operation. Do not store any item on top of the appliance when in operation. - 19. A fire may occur if Toaster is operated in an enclosed space, such as an appliance cabinet, caddy, garage, or other storage area.
- 20. Should the appliance emit heavy smoke, press Cancel and unplug immediately. Wait until it stops smoking before removing food. Then clean thoroughly.
- 21. Do not cover the vents (see parts diagram) while unit is operating. Doing so will prevent even cooking and may damage the unit or cause it to overheat.
- 22. Do not clean with metal scouring pads. Pieces can break off the pad and touch electrical parts, creating a risk of electric shock.
- 23. The use of accessory attachments not recommended by Pampered Chef may cause injuries.
24. DO NOT put foreign objects into gaps and crevices of the appliance. DO NOT insert utensils or other foreign matter into gaps or crevices. This may cause electric shock or other dangerous accidents. - 25. Never attempt to remove food jammed in the slots without unplugging the appliance from the electrical outlet first. Be sure not to damage the internal mechanism or Heating Elements when removing food.
- 26. DO NOT operate the appliance on an unstable or wet surface. Always operate the appliance on a dry, stable, non-combustible, level surface.
- 27. Be sure to take the food out carefully after toasting to avoid injuries.
- 28. Do not operate unattended.
29. Never use the Toaster on its side. Always use it in upright position. - 30. DO NOT move the unit while in operation. Make sure the unit is unplugged and cooled to room temperature before moving.
31. Avoid toasting foods with frostings or fillings that may run or that are made with open fillings. Frosting and fillings can catch fire. - 32. Do not toast pastries, tarts, and the like at any setting other than the lowest or lightest setting and never toast twice, as these items can ignite if overheated and cause fire.
- 33. Do not use with rice cakes, fried foods, frozen prepared foods, or non-bread items.
SAFEGUARDS
- 1. This appliance is for household use only; it is not intended for commercial use.
- 2. Clean frequently. Refer to the Cleaning section for proper maintenance.
- 3. DO NOT use Toaster as a source of non-cooking heat or for drying.
- 4. Be sure the outlet is designated for just this appliance and has nothing else plugged into it. Make sure not to use another appliance that is on the same circuit as that outlet at the same time as the Toaster.
- 5. Never toast food with extremely runny or loose ingredients such as butter, liquid, sugar, cheese, etc. See illustration 1.
- 6. Never connect this unit to an external timer switch, smart plug, or separate remote-control system.
- 7. The appliance should be placed so that any steam does not vent directly onto the kitchen cabinets. Steam may damage cabinets or shelves. 8. DO NOT store the unit in direct sunlight.
- 9. DO NOT use bread greater than 1" (2.5 cm) in thickness and 9" (23 cm) in length in Toaster Slots. Toast larger breads and buns on the Warming Rack.
- 10. Do not use the Warming Rack for anything other than larger breads and buns. See illustration 2.
- 11. DO NOT operate the appliance adjacent to or inside sinks and other sources of water.
- 12. Position the appliance away from any overhangs, walls, and table or countertop edges.
- 13. DO NOT insert or remove the plug with wet hands. To avoid injuries due to electric shock, make sure your hands are dry before plugging and unplugging the unit.
- 14. DO NOT use an adaptor, extension cord, or inverter with this appliance.
- 15. If you want to stop the Toaster and Cancel button does not work, unplug the unit.
ELECTRICAL HAZARDS
When using electrical appliances, basic safety precautions should always be followed including the following:
1. This appliance has a polarized plug (one blade is wider than the other). To reduce the risk of electric shock, this plug will fit in a polarized outlet only one way. If the plug does not fit fully into the outlet, reverse the plug. If it still does not fit, contact a qualified electrician. Do not modify the plug in any way. - 2. Use only with a 120V 60Hz power outlet with a minimum power rating of 15A. Failure to follow can result in electrical shock, fire, or other serious injury.
- 3. Make sure that your outlet voltage corresponds to the voltage stated on the rating label of the Toaster.
- 4. A short power-supply cord is provided to reduce risks resulting from becoming entangled in or tripping over a long cord.
- 5. If the plug fits loosely into the outlet, or if the outlet or plug feels warm, DO NOT use that outlet.
PARTS
A. Shade Knob
B. Warming Rack Lever
C. Warming Rack
D. Toaster Lever
E. Toaster Slots (x2)
F. Crumb Tray
G. Display
H. Bagel
I. Frozen
J. Reheat
K. Cancel
L. VentsCLEANING
- 1. Unplug the appliance and allow it to cool before cleaning.
- 2. Wipe the outside with soft dry cloth. Never use abrasive metal polish.
- 3. Crumb Tray:
- • Remove the Crumb Tray on bottom of the Toaster and empty it. To remove the tray, push in on tray. Replace the same way.
- • WARNING: If the Toaster is used frequently, accumulated breadcrumbs must be removed and cleaned frequently. Failure to clean the Crumb Tray may result in a fire hazard.
- • To clean the Crumb Tray, empty contents into garbage. Wipe with a soft dry cloth.
- • Make sure the Crumb Tray is completely installed and flush with the Toaster before using the Toaster again. See illustration 3.
- Note: Some fingerprints may appear on the outside of the Toaster. This is considered normal.
USE AND CARE
IMPORTANT BEFORE USE
Before first use:
- • Remove all packaging. Make sure all parts are present and accounted for.
- • Read all instructions in this document.
- • Clean all parts. See the Cleaning section for instructions.
- • For any questions, call the Solution Center at (888) 687-2433 (United States) or (800) 342-2433 (Canada).
INITIAL TEST RUN
- Note: As there is manufacturing residue or oil remaining in the Toaster or heating element, it usually emits the odor for the first use. It is normal and will not occur after the first several uses. Before the first use of the Toaster, it is required to operate the appliance without food:
- Note: Make sure the Crumb Tray is completely inserted in place before using.
- 1. Insert the power plug into a 120V 60Hz power outlet with a minimum 15A power supply.
- 2. Set the toasting shade to level 1 by turning the Shade Knob.
- 3. Press Toaster Lever down vertically until it clicks into place. Note: The Cancel button will be illuminated. Once finished, the Toaster Lever will automatically pop up.
To Use Toaster:
- 1. Insert the power plug into a 120V 60Hz power outlet with a minimum 15A power supply.
- 2. Make sure the Crumb Tray is completely inserted in place before using.
- 3. Put bread slice into the bread slot. Toaster has a capacity of 4 typical bread slices. NOTE: Do not use with bread greater than 1" (2.5 cm) in thickness and 9" (23 cm) in length in the Toaster Slots. Do not use with breads shorter than 2" (5 cm). See illustration 1. Toast larger breads and buns on the Warming Rack.
- 4. Set the toasting color by turning Shade Knob to your desired color. There are 7 shade levels (1=lightest, 7=darkest). Turn clockwise to increase shade level and turn counterclockwise to decrease shade level.
- 5. Press the Toaster Lever down vertically until it clicks into place. Note: The Cancel button will be illuminated. Once finished, the Toaster Lever will automatically pop up.
Note:
- • To help remove the toast, lift the Toaster Lever up. See illustration 2.
- • Two slices of bread in the same slot will be slightly darker than two slices of bread in two different slots.
- • Toasting shade will increase with multiple consecutive toasting cycles.
- • The Toaster Lever can only be used when the appliance is plugged in.
- • If the toasting shade is satisfactory, you may end the toasting process by pressing the Cancel button at any time.
Frozen Button:
- Frozen Button: Use this setting if the bread has been taken out from refrigerator or freezer.
- 1. Insert the power plug into 120V 60Hz power outlet and make sure the Crumb Tray is in place.
- 2. Set Shade Knob to your desired shade. Press the Toaster Lever down vertically until it clicks into place, then press the Frozen button (both the Frozen and Cancel buttons will be illuminated). Note: If the toasting shade is satisfactory, you may end the toasting process by pressing the Cancel button at any time.
Reheat Button:
- Reheat Button: Use this setting if you want to warm room-temperature toasted bread.
- 1. Insert the power plug into 120V 60Hz power outlet and make sure the Crumb Tray is in place.
- 2. Press the Toaster Lever down vertically until it clicks into place, then press the Reheat button (both the Reheat and Cancel buttons will be illuminated). Note: Reheating time in this mode is fixed, so the Shade Knob does not work with this setting.
Bagel Button:
- Use this setting if you only want to toast one side of the bagel slice. Note: Place bagel cut side facing out in this setting. See illustration 3.
- 1. Insert the power plug into 120V 60Hz power outlet and make sure the Crumb Tray is in place.
- 2. Set the Shade Knob to your desired color, press the Toaster Lever down vertically until it clicks into place, then press the Bagel button (both the Bagel and Cancel buttons will be illuminated).
- 3. Once the bread has been toasted to the preset color, the Toaster Lever will automatically pop up. Note: If the toasting shade is satisfactory, you may end the toasting process by pressing the Cancel button at any time.
Warming Rack:
- Warming Rack: Use this setting to toast buns.
- 1. Insert the power plug into 120V 60Hz power outlet and make sure the Crumb Tray is in place.
- 2. Press the Warming Rack Lever down vertically until it latches into place. The Warming Rack will pop up. See illustration 4.
- 3. Place the buns on top of the Warming Rack with the side you want toasted face down.
- 4. Set the Shade Knob to your desired color then press the Toaster Lever down vertically until it clicks into place.
Note: It is recommended to start at shade 3.
Note: Once the bread has been toasted to the preset color, the Toaster Lever will automatically pop up.
Note: If the toasting shade is satisfactory, you may end the toasting process by pressing the Cancel button at any time.
GUARANTEE
- • Two-year guarantee for noncommercial use. Refer to our website or the sales receipt for details.
Guarantee


