

 United States (en)
 Germany (de)
 Austria (de)
 France (fr)


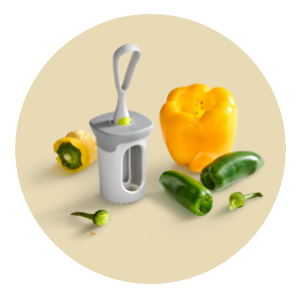


Deluxe Stand Mixer 3-Piece Pasta Roller & Cutter Set

Homemade Lasagna, Spaghetti, and Fettuccine Noodles
Pasta night is everyone’s favorite night of the week. With the Deluxe Stand Mixer 3-Piece Pasta Roller & Cutter Set, you can step up your favorite pasta dishes by making fresh homemade lasagna, spaghetti, or fettuccine noodles. Attach the roller or cutter to the Deluxe Stand Mixer to transform your small appliance into your very own pasta-making machine!
Use the Pasta Roller to roll out, extend, and thin homemade pasta dough into smooth, even pasta sheets. Choose from three settings to smooth out the dough. These pasta sheets are perfect for easy homemade lasagna, or you can take it a step further with one of the cutter attachments! Use the Spaghetti Cutter to cleanly cut the pasta sheets into spaghetti noodles or use the Fettuccine Cutter to make flat, even fettuccine noodles. You can use your fresh noodles right away or freeze them to use later.
Key Features
- The roller’s three settings let you easily prepare sheets of lasagna noodles, small spaghetti noodles, and flat fettuccine noodles. Great for beginner pasta-makers!
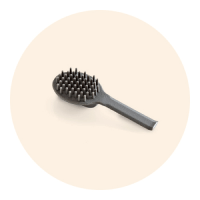
- Unlike other stand mixer pasta accessories on the market, our Pasta Roller, Spaghetti Cutter, and Fettuccine Cutter are easy to clean! You can easily pop off the lids and remove stuck-on dough in hard-to-reach areas with the included Dual-Sided Cleaning Brush and cleaning turning tool.
Product Details
- Includes a pasta roller, spaghetti cutter, fettuccine cutter, Dual-Sided Cleaning Brush, cleaning turning tool, and a recipe card
- Easily smooths and cuts homemade pasta dough into lasagna noodles, spaghetti, and fettuccine
- Use only with the Deluxe Stand Mixer
- Handwash only
Specs
- Pasta Roller: 8'' x 3'' (20 cm x 7.5 cm)
- Spaghetti Cutter and Fettuccine Cutter: 7¼'' x 3'' (18cm x 7.5cm)
- ABS, POM, PP, aluminum, and stainless steel
- Total weight of all pieces: 2.6 lbs. (1.17 kg)
Guarantee
- 2-year guarantee
-
Use & Care
Use & Care
Use & Care
SAFETY AND USE INSTRUCTIONS
- Read, understand, follow, and save all Safety and Use Instructions to avoid injury.
WARNING
- • Read, understand, and follow all Safety and Use Instructions to avoid injury.
- • Adult supervision is required when using with children or persons with reduced physical, sensory, or mental capabilities or lack of experience and knowledge. Children should be supervised to ensure that they do not play with the appliance.
- • Before using, review and follow all information in the Pampered Chef Deluxe Stand Mixer Use & Care Manual. If needed, contact Solution Center at (888) 687-2433 (United States) or (800) 342-2433 (Canada) for the Deluxe Stand Mixer Use & Care Manual.
- • Avoid contact with moving parts. Keep your hands, hair, clothing, spatulas, and all other utensils away from the Deluxe Stand Mixer and attachments during operation to reduce the risk of injury to persons and/or damage to the mixer.
- • The attachments should only be used with the Pampered Chef Deluxe Stand Mixer. DO NOT use them with other stand mixers or appliances.
- • DO NOT use if this product or the Deluxe Stand Mixer are damaged.
- • Before adding or removing the attachments or taking off the attachment hub cover, allow the Deluxe Stand Mixer to completely stop. Turn the mixer off and unplug the power cord.
- • Use caution when adding pasta dough to the attachments when the mixer is running.
- • DO NOT tilt open the mixer head while the attachments are in use.
- • DO NOT force the ingredients into any of the attachments.
- • Be cautious around the mixing shaft as it will continue to rotate while the attachments are being used on the attachment hub.
- • Never use a knife or any other sharp object that could damage the product to remove excess dough.
- • DO NOT run a dish towel, paper towel, or any other cloth through the attachments to clean them.
SAFEGUARDS
- • Keep away from heat sources such as cooktops, toasters, air fryers, etc.
- • This product is designed for household use only.
- • Each attachment must be used at Speed 1 on the Custom Setting to prevent damage to the Deluxe Stand Mixer and the attachments. DO NOT use the attachments on any other preset.
- • Only use with Pampered Chef-approved recipes.
- • DO NOT clean the attachments while they’re attached to the Deluxe Stand Mixer.
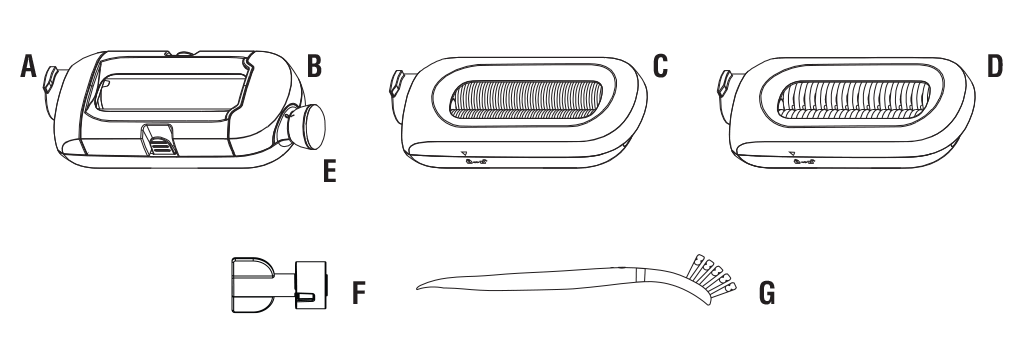
PARTS
- A. Power Shaft
- B. Pasta Roller
- C. Spaghetti Cutter
- D. Fettuccine Cutter
- E. Roller Adjustment Knob
- F. Cleaning Turning Tool
- G. Dual-Sided Cleaning Brush
BEFORE CLEANING
- • Turn the Deluxe Stand Mixer off and unplug. Then, remove attachment from the Deluxe Stand Mixer.
- • Disassemble the attachment before cleaning it.
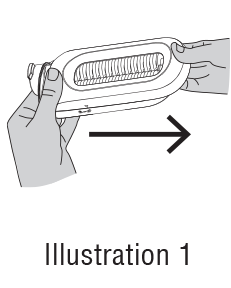
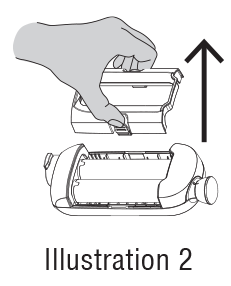
- • To remove the protective cover to clean:
- • For the Spaghetti and Fettuccine Cutters, slide the cover in the direction of the arrow on top, pushing one end with one hand and pulling the round edge with the other hand. See illustration 1.
- • For the Pasta Roller, lightly squeeze both tabs at the same time and lift the cover off. See illustration 2.
- • To replace the cover:
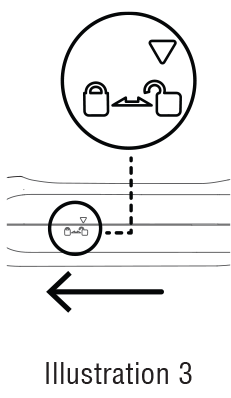
- • For the Spaghetti and Fettuccine Cutters, use the lock and unlock icon on the sides for reference. Align the arrow on the cover with the unlock icon on the base. Then, slide the cover toward the locking icon until it snaps into place. See illustration 3.
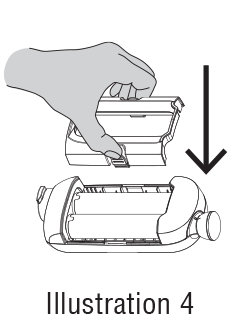
- • For the Pasta Roller, line the cover on top of the roller using the arch at the top as a guide. Gently press each tab down until it clicks into place. See illustration 4.
- • Let the Spaghetti Cutter, Fettuccine Cutter, and Pasta Roller air-dry for one hour. Then, remove any dried dough with the Cleaning Brush and Cleaning Turning Tool (included). If dried dough is difficult to remove, try tapping the attachment with your hand. Use a plastic or wooden toothpick, if necessary.
CLEANING
- • Wash before using for the first time; hand wash only.
- • Allow to dry completely before storing or using.
- • To avoid damage, DO NOT immerse attachments in water or other liquids. DO NOT wash in the dishwasher.
USE AND CARE
Note: Prepare your pasta dough ahead of time according to the recipe.
- • Turn off the Deluxe Stand Mixer and unplug it.
- • Remove the bowl and other attachment from the mixing shaft.
- • Ensure the mixer head is not tilted, e.g., locked into place.
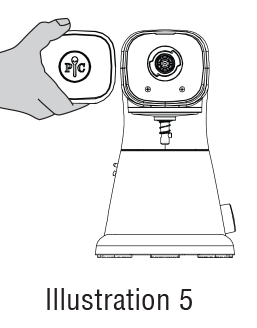
- • Remove the attachment hub cover. See illustration 5.
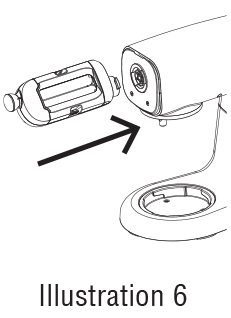
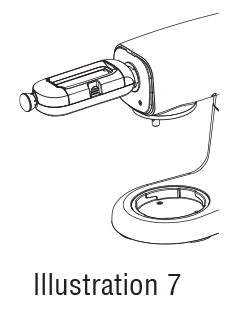
- • Turn the Pasta Roller slightly toward you and insert the end of the attachment into the attachment hub, making sure the power shaft fits into the hub socket. See illustration 6. Turn the Pasta Roller so it’s parallel to the countertop. See illustration 7. Make sure the attachment is secure and level before use.
- • Pull the roller adjustment knob straight out and turn to Setting 3. Release the knob, making sure the pin on the roller housing engages the opening on the back of the adjustment knob, allowing the knob to fit flush against the roller housing.
- • Turn the Deluxe Stand Mixer to Speed 1 on the Custom setting. DO NOT use any other speed or preset.
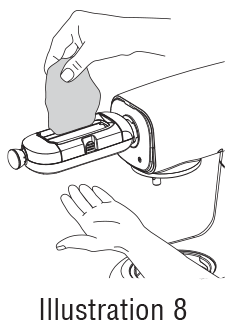
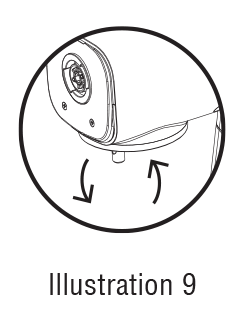
- • Feed the flattened dough into the attachment. Dust the dough with flour while rolling to aid in drying and separation. When using with the roller, we recommend repeating this process one more time, for a minimum of two passes per setting to further flatten the dough. See illustration 8. Be cautious around the mixing shaft because it will continue to rotate when the attachments are in use. See illustration 9.
- • Turn the mixer off and unplug it. Turn the knob to Setting 2 and repeat the rolling process. Continue to increase the setting until you reached your desired thickness.
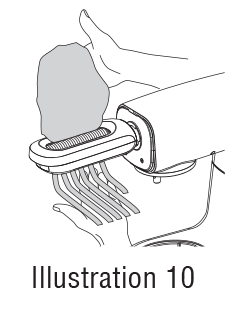
- • To make noodles, turn the mixer off and unplug it. Then, exchange the Pasta Roller for a cutter of your choice by following the same assembly instructions. Feed the flattened sheets of dough through the cutter. Dust the pasta with flour while cutting to aid in drying and separation. See illustration 10.
Helpful Tips:
- • If the dough is coming out of the roller with ripples, add more flour.
- • For best results, only use Pampered Chef-approved pasta dough recipes.
- • DO NOT fold the dough when feeding it into the Spaghetti Cutter, Fettuccine Cutter, or Pasta Roller.
GUARANTEE
- • Two-year guarantee for noncommercial use. Refer to our website or the sales receipt for details.
Made in China
Guarantee
Use & Care
SAFETY AND USE INSTRUCTIONS
- Read, understand, follow, and save all Safety and Use Instructions to avoid injury.
WARNING
- • Read, understand, and follow all Safety and Use Instructions to avoid injury.
- • Adult supervision is required when using with children or persons with reduced physical, sensory, or mental capabilities or lack of experience and knowledge. Children should be supervised to ensure that they do not play with the appliance.
- • Before using, review and follow all information in the Pampered Chef Deluxe Stand Mixer Use & Care Manual. If needed, contact Solution Center at (888) 687-2433 (United States) or (800) 342-2433 (Canada) for the Deluxe Stand Mixer Use & Care Manual.
- • Avoid contact with moving parts. Keep your hands, hair, clothing, spatulas, and all other utensils away from the Deluxe Stand Mixer and attachments during operation to reduce the risk of injury to persons and/or damage to the mixer.
- • The attachments should only be used with the Pampered Chef Deluxe Stand Mixer. DO NOT use them with other stand mixers or appliances.
- • DO NOT use if this product or the Deluxe Stand Mixer are damaged.
- • Before adding or removing the attachments or taking off the attachment hub cover, allow the Deluxe Stand Mixer to completely stop. Turn the mixer off and unplug the power cord.
- • Use caution when adding pasta dough to the attachments when the mixer is running.
- • DO NOT tilt open the mixer head while the attachments are in use.
- • DO NOT force the ingredients into any of the attachments.
- • Be cautious around the mixing shaft as it will continue to rotate while the attachments are being used on the attachment hub.
- • Never use a knife or any other sharp object that could damage the product to remove excess dough.
- • DO NOT run a dish towel, paper towel, or any other cloth through the attachments to clean them.
SAFEGUARDS
- • Keep away from heat sources such as cooktops, toasters, air fryers, etc.
- • This product is designed for household use only.
- • Each attachment must be used at Speed 1 on the Custom Setting to prevent damage to the Deluxe Stand Mixer and the attachments. DO NOT use the attachments on any other preset.
- • Only use with Pampered Chef-approved recipes.
- • DO NOT clean the attachments while they’re attached to the Deluxe Stand Mixer.
PARTS
- A. Power Shaft
- B. Pasta Roller
- C. Spaghetti Cutter
- D. Fettuccine Cutter
- E. Roller Adjustment Knob
- F. Cleaning Turning Tool
- G. Dual-Sided Cleaning Brush
BEFORE CLEANING
- • Turn the Deluxe Stand Mixer off and unplug. Then, remove attachment from the Deluxe Stand Mixer.
- • Disassemble the attachment before cleaning it.
- • To remove the protective cover to clean:
- • For the Spaghetti and Fettuccine Cutters, slide the cover in the direction of the arrow on top, pushing one end with one hand and pulling the round edge with the other hand. See illustration 1.
- • For the Pasta Roller, lightly squeeze both tabs at the same time and lift the cover off. See illustration 2.
- • To replace the cover:
- • For the Spaghetti and Fettuccine Cutters, use the lock and unlock icon on the sides for reference. Align the arrow on the cover with the unlock icon on the base. Then, slide the cover toward the locking icon until it snaps into place. See illustration 3.
- • For the Pasta Roller, line the cover on top of the roller using the arch at the top as a guide. Gently press each tab down until it clicks into place. See illustration 4.
- • Let the Spaghetti Cutter, Fettuccine Cutter, and Pasta Roller air-dry for one hour. Then, remove any dried dough with the Cleaning Brush and Cleaning Turning Tool (included). If dried dough is difficult to remove, try tapping the attachment with your hand. Use a plastic or wooden toothpick, if necessary.
CLEANING
- • Wash before using for the first time; hand wash only.
- • Allow to dry completely before storing or using.
- • To avoid damage, DO NOT immerse attachments in water or other liquids. DO NOT wash in the dishwasher.
USE AND CARE
Note: Prepare your pasta dough ahead of time according to the recipe.
- • Turn off the Deluxe Stand Mixer and unplug it.
- • Remove the bowl and other attachment from the mixing shaft.
- • Ensure the mixer head is not tilted, e.g., locked into place.
- • Remove the attachment hub cover. See illustration 5.
- • Turn the Pasta Roller slightly toward you and insert the end of the attachment into the attachment hub, making sure the power shaft fits into the hub socket. See illustration 6. Turn the Pasta Roller so it’s parallel to the countertop. See illustration 7. Make sure the attachment is secure and level before use.
- • Pull the roller adjustment knob straight out and turn to Setting 3. Release the knob, making sure the pin on the roller housing engages the opening on the back of the adjustment knob, allowing the knob to fit flush against the roller housing.
- • Turn the Deluxe Stand Mixer to Speed 1 on the Custom setting. DO NOT use any other speed or preset.
- • Feed the flattened dough into the attachment. Dust the dough with flour while rolling to aid in drying and separation. When using with the roller, we recommend repeating this process one more time, for a minimum of two passes per setting to further flatten the dough. See illustration 8. Be cautious around the mixing shaft because it will continue to rotate when the attachments are in use. See illustration 9.
- • Turn the mixer off and unplug it. Turn the knob to Setting 2 and repeat the rolling process. Continue to increase the setting until you reached your desired thickness.
- • To make noodles, turn the mixer off and unplug it. Then, exchange the Pasta Roller for a cutter of your choice by following the same assembly instructions. Feed the flattened sheets of dough through the cutter. Dust the pasta with flour while cutting to aid in drying and separation. See illustration 10.
Helpful Tips:
- • If the dough is coming out of the roller with ripples, add more flour.
- • For best results, only use Pampered Chef-approved pasta dough recipes.
- • DO NOT fold the dough when feeding it into the Spaghetti Cutter, Fettuccine Cutter, or Pasta Roller.
GUARANTEE
- • Two-year guarantee for noncommercial use. Refer to our website or the sales receipt for details.
Made in China
Guarantee


