

 United States (en)
 Germany (de)
 Austria (de)
 France (fr)


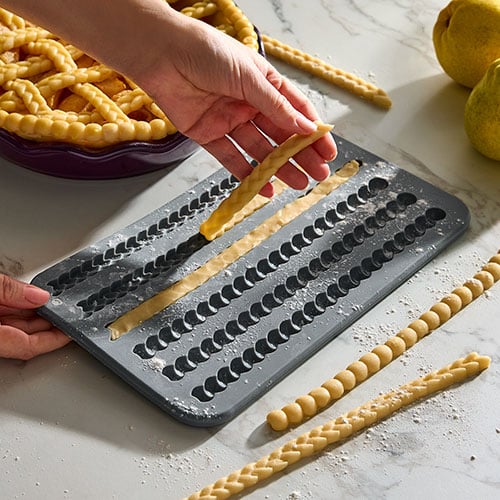


Silicone Pie Crust Mold

Dress Up Your Dough
Give your pies the glow-up they deserve! The Silicone Pie Crust Mold helps you create flawless crust designs in just a few simple steps. Press your dough into the mold, pop out the patterned strips, place them on your pie, and bake—it’s really that easy!
Use any of the three braid molds or three pearl molds to add specialty patterns to your pies. You can use them to create a lattice on top or a beautiful ring around the rim of your pie. The flexible, nonstick silicone easily releases the dough, so your results always look like they came straight out of a bakery case. Your desserts will be dressed to impress—no fancy skills required!
Why You’ll Love It
- You can make two different shapes (braids or pearls) and use them to create unique designs on your pies, tarts, and quiches.
- Made with flexible, easy-release silicone, each mold releases dough without sticking or tearing.
Use It for
- Add a picture-perfect edge to your pies and tarts.
- Create braided or fluted crusts in seconds.
- Dress up sweet or savory quiches with decorative borders.
- Make mini tart toppers that wow.
- Use the decorative strips to create a lovely, lattice-style look.
- An easy way to elevate store-bought crusts.
Product Details
- 11¾'' x 6 ½'' x ½'' (30 cm x 17 cm x 1 cm)
- Features three braid molds and three pearl molds.
- Use three patterned strands to beautifully decorate the rim of a 9'' (23-cm) pie
- Made of sturdy, nonstick silicone
- Microwave-, freezer- and oven-safe
- Dishwasher-safe
- 3-year guarantee
Ways to Use
- We created the perfect pie dough to use with the mold. See the Stand Mixer Pie Crust.
-
Use & Care
Use & Care
Use & Care
SAFETY AND USE INSTRUCTIONS
- Read, understand, follow, and save all Safety and Use Instructions to avoid injury.
WARNING
- • Adult supervision is required when using with children or persons with reduced physical, sensory, or mental capabilities or lack of experience and knowledge.
- • For best results, spread or press the mixture to the edges of the cavities.
SAFEGUARDS
- • Hot silicone can cause burns if handled improperly. Always use heat-resistant oven mitts or pads when you’re handling or placing on surfaces.
- • Do not use under the broiler or on a direct heat source.
- • Not recommended for microwave use.
- • Do not insert toothpicks, knives, or other sharp objects into the mold. They can puncture the silicone.
CLEANING
- • Wash prior to first use; dishwasher-safe.
- • Aerosol nonstick spray is not recommended; it will create a sticky residue which is difficult to clean.
- • To deep clean, prepare a baking soda paste by mixing ½ cup (125 mL) of baking soda with 3 tbsp (45 mL) of water. Apply it as needed and let it dry completely. Rinse with hot water and dish soap.
- • Don’t use abrasive sponges. They can damage the mold.
USE AND CARE
- • Silicone tray is freezer-safe and refrigerator-safe.
- To use:
- 1. Chill pie dough for 30 minutes.
- 2. Lightly flour the pie crust mold before pressing dough into it.
- 3. Form an approximately 1½” (4 cm) ball of dough and roll it into a rope to the length of the mold cavities. Add flour as needed while rolling to prevent sticking.
- • For best results, make one long rope for each cavity instead of adding dough as needed to fill each cavity.
4. Use your hands to firmly press the dough ropes into the cavities. Trim the excess dough with a floured flat-edge tool as necessary. If there are any open spaces in the cavities after trimming, gently press dough to fill the spaces. - 5. To remove the dough, flip the mold over and gently peel the rope away from the mold.
- • When lining the perimeter of pie pan with a rope, brush the bottom pie crust edge with water first before applying the rope to help it adhere.
- • When making a lattice, fold the edge of the rope under the bottom crust to help it adhere.
- 6. For best results brush the dough ropes with and egg wash. For more detailed design, chill the fully assembled pie for 1 hour if not using a fresh fruit filling.
GUARANTEE
- • Three-year guarantee for noncommercial use. Refer to our website or the sales receipt for details
Made in China
Guarantee


header goes here
content goes here.


