Deluxe Electric Grill & Griddle FAQ
The plates take about five minutes to preheat in the Closed position and a little longer in the Flat position.
Reseat the plates. If this doesn’t solve the issue, contact our Solution Center at (888) 687-2433 (U.S.) or (800) 342-2433 (Canada) for help.
The grill is made with the following materials:
• Cast aluminum cooking plates with an integral heating tube
• PFOA-free nonstick coating
• Phenolic (thermoset plastic)
• Stainless steel
• Cast aluminum arms
• Plastic (fiberglass reinforced nylon)
• Painted sheet metal
• Plastic (filled polypropylene)
• Silicone
• ABS+PET
• ABS with nickel plating
• Aluminized steel
Here’s how to use the presets.
1. Follow the steps in the Preparing to Cook section within the Deluxe Electric Grill & Griddle use and care.
2. The unit will be automatically set to the Custom setting when turned on.
3. Turn the wheel to the desired setting and press to enter.
4. On the display, the time will blink while the temperature is solidly lit. Turn the wheel to the desired time in intervals of 30 seconds. In Griddle and Keep Warm modes, the time is changed in intervals of 5 minutes. Press to select. See Note below.
5. Rotating dashes indicate that the grill is preheating.
6. You will hear 3 beeps when the preheating is done. Add the food and press the wheel to start the timer. If the timer is not started, the unit will beep every 2 minutes to remind you to start the timer. If the timer is not started after 16 minutes, the unit will finish cooking.
7. Once cooking is completed, you will hear 5 beeps and the display will indicate “End.”
Note: The Temp button can be used to modify the temperature setting in any mode except Probe and Keep Warm.
Here’s a helpful chart.
| Preset | Food | Default Time | Default Temperature | Time Range |
| Sear | Meats, vegetables | 3 minutes | 450°F (230°C) | 30 seconds–30 minutes |
| Panini | Panini, sandwiches | 2 minutes | 375°F (190°C) | 30 seconds–60 minutes |
| Grill | Meats, vegetables | 3 minutes | 400°F (200°C) | 30 seconds–60 minutes |
| Keep Warm | N/A | 30 minutes | 140°F (60°C) | 5–60 minutes |
| Griddle | Breakfast foods | 60 minutes | 350°F (180°C) | 5–90 minutes |
The temperature probe helps you cook food that is at least ½" (1-cm) thick to the temperature you want, though you’ll get more accurate results if the food is 1" (2.5-cm) thick or more. Here’s how:
1. Firmly insert the probe plug into the probe socket on the side of the unit and press the Probe button. The display will show dashes in the timing area and the default cooking temperature of 400°F (200°C) will be blinking. The word ‘Probe’ will be flashing.
2. Turn the wheel to the desired cooking temperature and press to select.
3. The word ‘Probe’ will be solidly lit and the default temperature of 140°F (60°C) will blink.
4. Turn the wheel to the desired food temperature and press to select.
5. Rotating dashes indicate that the unit is preheating.
6. You’ll hear 3 beeps when preheating is done. Insert the probe into the thickest part of the food while avoiding touching any bones (if applicable) and the plate; add the food to the unit. The display will show the current temperature of food.
7. Press the wheel to start the probe temperature monitoring.
Note: The Time button will not work while using the probe.
General
Our grill has a unique combination of features that include a heating element in the plates, multiple settings, and a temperature probe. The grill’s plates use a heating element that conducts heat, so food cooks faster. Our grill also includes multiple settings—including one that lets you set the top and bottom plates to different temperatures, so you can cook multiple foods at once. Plus, when using the probe, the grill automatically turns off once the food reaches the food temperature you’ve set, so it’s made just the way you like.
• Custom
• Sear
• Panini
• Grill
• Keep Warm
• Griddle
The grill also includes a TOP/BTM setting that lets you set the top and bottom plates to different temperatures, and a probe setting that let’s you set the temperature of the food.
The initial test run helps you get familiar with your grill and ensures that it’s performing at its best before you start cooking.
Try one of the three simple meals at the beginning of the Deluxe Electric Grill & Griddle Cooking Guide.
The grill’s exterior is 17" x 14" (43 cm x 35 cm).
The grill has a rated wattage of 1800W.
The grill has a power supply/voltage of 120V, 60 Hz.
Operating Functions
No.
The unit defaults to the Custom setting in Fahrenheit. Press and hold down the Time and Cancel buttons at the same time to switch from Fahrenheit to Celsius and back.
Yes! Hit the Time button to adjust the time. You can also quickly add time in 30-second intervals by pressing the Add 30 Sec button. You can hit the Temp button to adjust the temperature, too.
Cooking
The cooking guide that comes with your grill can help you choose a setting to use for your recipe.
Yes. Some steam may appear when you use the grill. Steam comes off foods naturally while cooking. Always use an oven mitt while you open and close the lid.
Here are the different cooking positions.
• Closed. Lift the handle so that the top is vertical and locks into place (should not lay flat). Using the handle, lower the top so that the plate makes contact with the food during cooking. For thicker food, the upper plate can be left in the unlocked position. This can be done by pressing down slightly on the front of the top plate to release the hinge and allow the plate to hover. If you’re doing so while the unit is hot, always wear an oven mitt. You can also use the adjustable height and lid fastening lever on the right of the unit to set the height.
• Top Melt. Press down slightly on the front edge of the top to release the top center hinge, allowing the plate to hover. If you’re doing so while the unit is hot, always wear an oven mitt. Lower it to the desired height then slide the adjustable height and lid fastening lever on the right of the unit into a notch to set the position. Note: The top plate should not make contact with the top of the food when using this feature.
• Flat.Locate the hinge release lever on the right arm of the handle. With your left hand on the handle, use your right hand to slide the lever toward you. Push the handle back until the top rests flat on the counter. The unit will stay in this position until you lift the handle and the top to return it to the Closed position. If the unit is already in the Flat position and you want to adjust it to the Closed position, pull the handle slightly toward you while the top stops at the 100° position.
No, the probe can only be used in the ‘Probe’ setting.
Here’s how to use the Top/Bottom button:
1. Press the Top/Bottom button after setting the time in any mode.
2. The word TOP will be solidly lit in the display screen and the temperature will flash.
3. Adjust the top temperature by turning the wheel; press to select.
4. BTM will be solidly lit. Adjust the bottom temperature by turning the wheel; press to select.
5. If the top and bottom preset temperatures are different, the display will show TOP and the top plate temperature for 3 seconds and then show BTM and the bottom plate temperature for another 3 seconds. The display will continue to switch back and forth during cooking.
WARNING: The unit will be hot while preheating, during cooking, and after cooking. Do not touch any hot surfaces. Always use oven mitts to remove all contents including accessories and food. Allow the unit and accessories to cool completely before cleaning. See the Cleaning section for instructions.
Components
The Deluxe Electric Grill & Griddle includes:
• Grill unit
• Drip Tray (with probe storage)
• Removable Shield
• 2 Grill Plates
• 2 Griddle Plates
• Cleaning Tool
• Temperature Probe
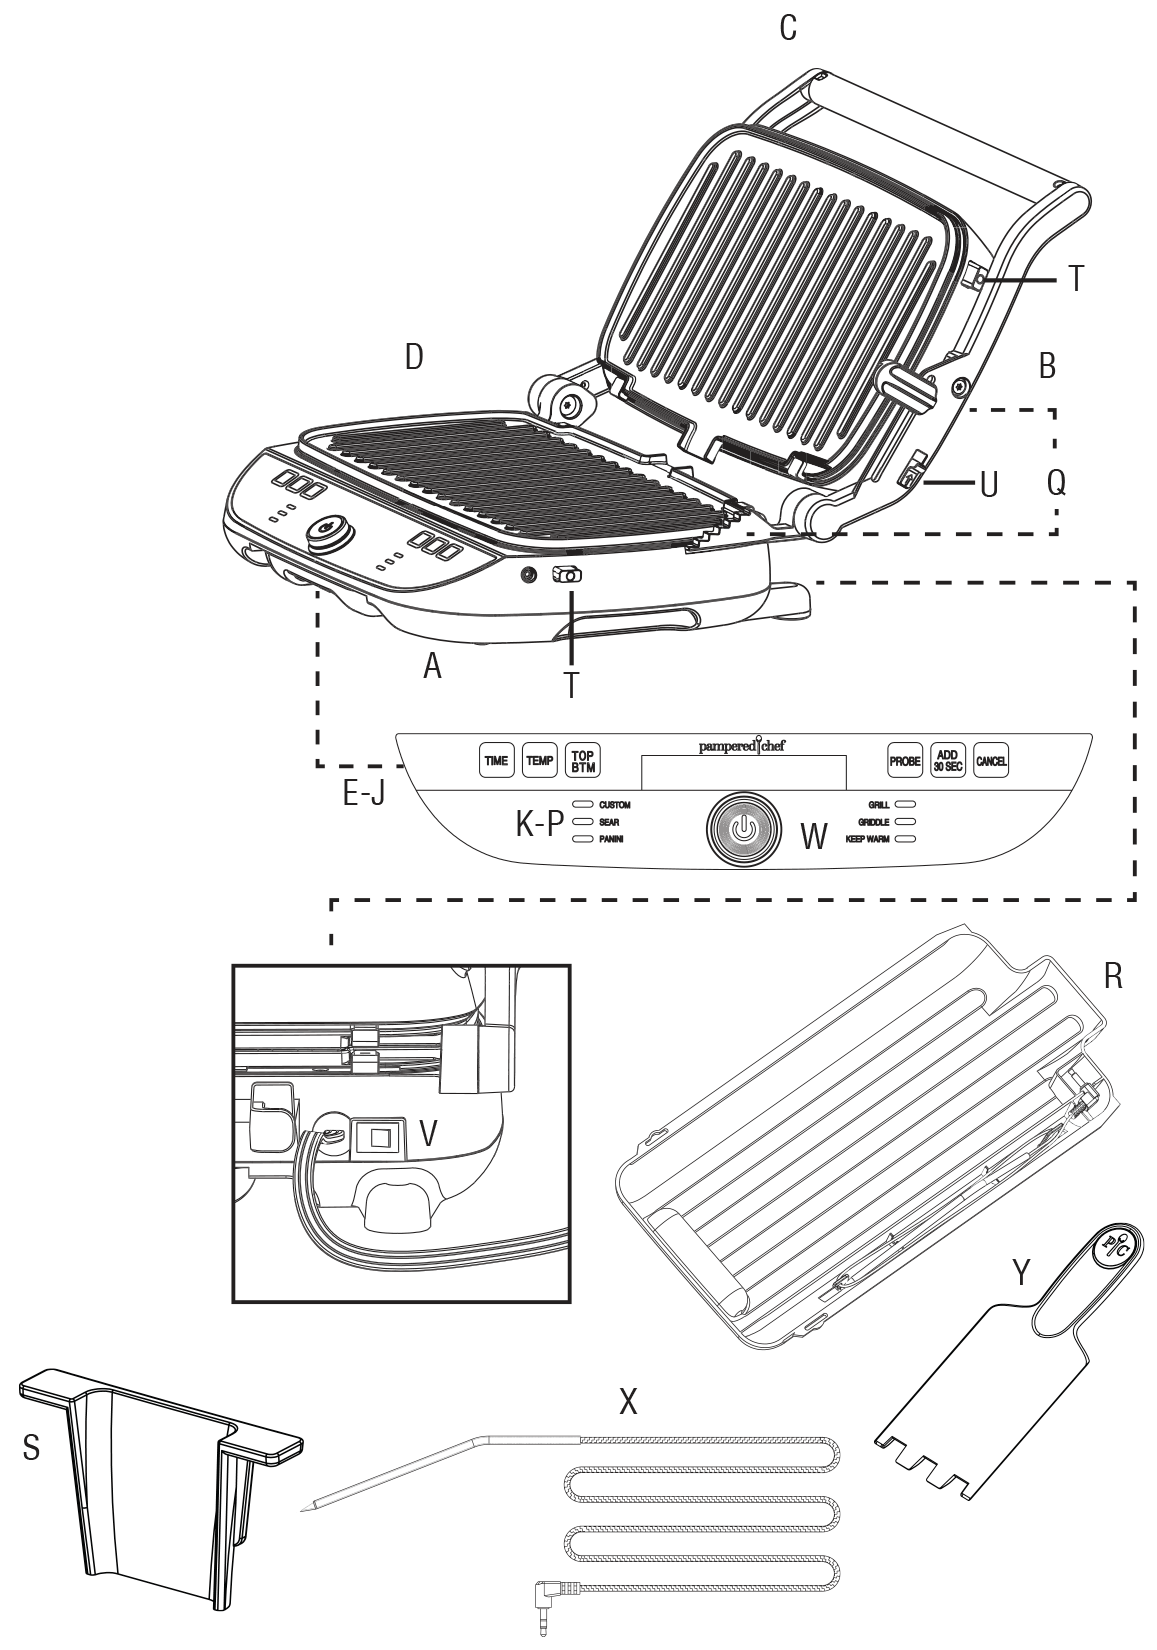
Note: Waffle plates sold separately or as part of the Deluxe Electric Grill & Griddle Set.
No. Only the authorized accessories sold by Pampered Chef can be used with the Deluxe Electric Grill & Griddle. Using accessory attachments with the Deluxe Electric Grill & Griddle that are not authorized by Pampered Chef may cause injuries. Any authorized accessory that has been damaged in any manner should not be used.
Here’s how you clean it.
• Cleaning tool, drip tray, and plates: Dishwasher-safe; place these away from the heating element.
• Probe: Hand-wash only.
• Unit: Wipe clean with a damp cloth and take care to keep liquid away from any electrical parts.
• Do not use harsh chemicals, scouring pads, or other abrasive cleaners.
• There is a removable drip shield on the back of the unit. Remove and hand wash as needed. Always place the drip shield back on the unit before using the unit again.
• Make sure that the unit is dry and clean before placing the plates in it.
Here’s how you store your Deluxe Electric Grill & Griddle:
• When storing the grill or it’s not in use, do not fold or kink the power cord. Wrap the cord around the prongs on the back of the unit.
• Do not store food in the unit. Note: The adjustable height and lid fastening lever can be placed in the first position to fasten the lid for storage. Never use the handle to carry or move the unit.
Start by referencing the troubleshooting guide in the Deluxe Electric Grill & Griddle use and care. If this doesn’t solve the issue, contact our Solution Center at (888) 687-2433 (U.S.) or (800) 342-2433 (Canada) for help.


 United States (en)
 Germany (de)
 Austria (de)
 France (fr)
