

 United States (en)
 Germany (de)
 Austria (de)
 France (fr)
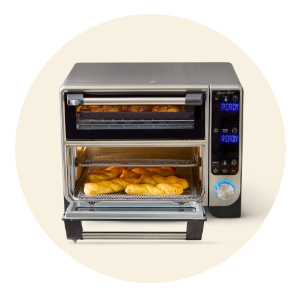


Deluxe Air Fryer Oven
A: 18 1/4" wide x 17 1/4" deep x 14 1/4" tall (46.5 cm wide x 44 cm deep x 36 cm tall)
A: 1700W
A: 120V AC/ 60Hz
A: The weight of the Deluxe Air Fryer Oven in the box is 35.75lbs. The unit itself is about 28 pounds.
A: External: Stainless Steel, Cold rolled steel, Polypropylene plastic, glass filled nylon plastic. Oven glass, LCD display
A: Double Deluxe Air Fryer Oven Deep Cleaning Instructions:
- Always turn the appliance off by pressing the power knob, disconnect the appliance from the power outlet, and allow it to cool before cleaning. Unplug the unit from the outlet and allow it to cool down before cleaning
- For best results, clean your accessories and wipe down the inside and outside of your unit after every use. This will keep your air fryer cleanest over time.
- Accessories:
- If grease builds up, remove all accessories including crumb trays. Soak accessories in warm soapy water for about an hour.
- Use a non-abrasive brush to clean accessories after soaking.
- If grease still remains, use a non-abrasive brush or a microfiber towel with a mixture of baking soda and vinegar.
- Depending on how much built up there is, this process may need to be repeated.
- Outside Unit:
- Use Stainless Steel cleaner according to instructions on bottle.
- Note: DO NOT use inside the unit.
- Inside Unit:
- If grease builds up, use a non-abrasive brush or a microfiber towel with a mixture of baking soda and vinegar.
- After scrubbing, use a soft damp towel to clean any remaining mixture out of the unit.
- With the oven empty, run at 450F for 10 minutes to bake off any remaining mixture.
- After it cools, wipe down again with a soft damp towel.
- Depending on how much built up there is, this process may need to be repeated.
A:
|
Item No |
Description |
Fits Upper Oven |
Fits Lower Oven |
Notes |
|---|---|---|---|---|
|
|
Bakeware |
|
||
|
100901 |
Round Cake Pans (4) |
X |
X |
|
|
100666 |
Secret Center Cake Pan |
X |
X |
|
|
101216 |
8" (20-cm) Brilliance Nonstick Square Pan With Lid |
|
X |
|
|
100668 |
8"(20-cm) Square Pan w/ Lid |
X |
X |
|
|
1603 |
Fluted Cake Pan |
|
X |
|
|
100596 |
9" (23-cm) Springform Pan |
|
X |
|
|
100669 |
Tart Pan w/ Lid |
X |
X |
|
|
100747 |
Cupcake Baking Set |
|
X |
Only the silicone cupcake pan |
|
101386 |
Half Pie Pan & Server Set |
|
X |
Use one pan at a time. |
|
Item No |
Description |
Fits Upper Oven |
Fits Lower Oven |
Notes |
|
|
Cookware |
|
||
|
100597 |
Modular Sheet Pans |
X |
X |
Only one 6-1/4 x 8-3/4 pan fits in upper and/or lower ovens. |
|
100248 |
1-qt. Enameled Cast Iron Baker |
X |
X |
|
|
3139 |
Rockcrok Everyday Pan |
|
X |
|
|
100178 |
10" (25-cm) Cast Iron Skillet |
|
X |
Handles need to be position in one direction in order to fit in bottom oven. |
|
100250 |
5.5" (14-cm) Cast iron Skillet Set |
X |
X |
|
|
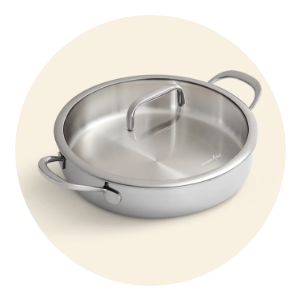
100049 |
Pressure Cooker Ceramic Pot |
|
X |
|
|
Item No |
Description |
Fits Upper Oven |
Fits Lower Oven |
Notes |
|
|
Stoneware |
|
||
|
100738 |
Stone Pie Plate |
X |
X |
|
|
100900 |
Stone Round Baker |
|
X |
|
|
100916 |
Stone Square Baker |
|
X |
|
|
100917 |
Stone Square Serving Tray |
X |
X |
|
|
100915 |
Stone Square Baker w/Tray |
X |
X |
|
|
101337 |
Small Oven Square Pizza Stone |
X |
X |
|
|
100253 |
Personal Pizza Stone |
X |
X |
|
|
100256 |
Small Stone Bar Pan |
X |
X |
|
|
100221 |
Stone Loaf Pan |
|
X |
|
|
1455 |
Small Bowl (Graystone) |
|
X |
|
|
1456 |
Small Bowl (Sandstone) |
|
X |
|
|
10083 |
Medium Serving Bowl |
|
X |
|
|
100105 |
Small Graystone Serving Bowl |
|
X |
|
|
|
||||
|
|
Other: |
|
|
|
|
101112 |
Modular Grill Pan |
|
Small Only |
|
Note: Make sure food does not touch heating elements, even when rising.
Note: Non PC pans must have ¼ inch clearance.
- Make sure the power cord is securely plugged into the outlet.
- Insert the power cord into a different outlet.
- Press the power button.
- Contact licensed electrician if a faulty outlet is suspected.
A: For best results, keep an eye out on your food while cooking. Refer to cook charts and the Cooking Guide for more instructions.
A: This is normal. The oven is designed to control temperature accuracy by adjusting the heating elements’ power level. The oven is designed to control the temperature by cycling the heating elements on and off.
A: During preheating, the unit will not reach the intended cook temperature, but it will preheat to a level that will start cooking your ingredients. As the cook cycle continues, the oven will continue to heat up and cook your food to doneness. It may take up to 10 minutes for the unit to reach the intended cooking temperature. This does not affect the cooking quality of most recipes.
A: This is normal. Foods with a high moisture content may release steam around the door.
A: There may be some food debris in the oven. Make sure to wipe down the oven and clean the crumb tray after each use.
A: This is normal. The condensation created by foods with a high moisture content (such as frozen foods) may run down the inside of the door and drip onto the counter.
A: It is highly recommended to clean all accessories and the inside of the oven after each use to prevent grease build up that can cause smoke.
- Do not let food touch the heating elements.
- Ensure you are using the sheet pan when cooking all greasy foods, or when using Air Fry, Air Roast, or Whole Roast functions.
- If problem persists, run a Toast cycle on shade 7 with accessories removed, this will burn off any additional grease on the heating elements that are causing smoke.
A: For stuck-on food, let the sheet pan soak before cleaning.
- Line the sheet pan with the appropriate size aluminum foil or parchment paper when cooking to make clean-up easier.
A: The unit uses 1700 watts of power, so it must be plugged into an outlet on a 15-amp circuit breaker. It is also important that the unit be the only appliance plugged into an outlet when in use. To avoid tripping a breaker, make sure the unit is the only appliance plugged into an outlet on a 15-amp breaker.
A: The cooling fan may continue to run even after the unit has been turned off. This is a normal function and should not be a source of concerns. The cooling fan will stop after the temperature of the unit reaches below 95F (35 C).
A: It is for factory use.
A: It is recommended to turn the box on its side to help take it carefully out of the box. Or you can break down the entire box to remove the unit.
A: It is at the bottom of the box under the foam under the air fryer.
A: Yes! This Air Fryer is tested for safety by ETL Intertek and meets FDA standards.
A: Open the door fully (not just the bottom compartment door) to remove the tray. See U&C for more information.


